SSO Extension Tutorial
One of the most common questions we receive is how the SDK supports single sign-on or “SSO” integration, with Q2 acting as an identity provider for other services. As of SDK version 2.19.0, we have a new extension type dedicated to handling SSO integration, greatly simplifying the process. The SSO Extension type allows us to create an SSO in any format we would like to. For example, an SSO could be a simple server-to-server call to exchange info and then deliver the user via a URL, could be a JWT(JSON Web Token) where we decode the token and verify the signature or a SAML(Security Assertion Markup Language) assertion based SSO.
For this tutorial, we opted for the most complicated version (SAML). In practice, you will likely not need something so involved.
Note
If you are unfamiliar with the SSO workflow or how SAML works, we recommend looking here: https://duo.com/blog/the-beer-drinkers-guide-to-saml
The Q2 platform can verify the identity of end-users and pass that information to other services, but it is not a true identity provider and cannot process SAML requests. That’s where the Caliper SDK comes in.
A little background: SAML authentication workflows generally fall into two categories: identity provider-initiated, and service provider-initiated.
In the first category, a user goes to the identity provider first and is redirected to the service. The second category begins at the service provider, which sends the user to the identity provider, which in turn returns them to the service provider with the appropriate authentication.
The Caliper SDK provides a identity provider-initiated workflow: usually, this is what is desired as SSO workflows will begin in Online and link out to the service, with authorization. A service provider-initiated workflow can be approximated, but it is much more complex and solutions will be specific to individual service providers. The following example will demonstrate the standard Online-first (Idp-Initiated) workflow.
Example
For an out-of-the-box working example follow these steps. For more information on how to build this extension, continue on after this section. If you would like to clone the completed extension click here.
Type
q2 create_extensionand select the SSOExtension type. Enter ‘ExampleSSO’ as the extension name.Copy the below code into the appropriate files within the newly created extension. Create a new file for
sso.html.jinja2under templates.Follow the steps under the Key Creation and Vault Storage section.
Type
q2 installto install the extension as a form. Keep the defaults for the vendor configs when prompted.Type
q2 add_to_navand select where the extension should live inside navigationType
q2 invalidate_hq_cache -t ThirdPartyDataElementsType
q2 runto start the serverNavigate to the new form in the online stack. It should auto post to the demo SAML consumer site and, if successful, present information about the SAML assertion.
"""
ExampleSSO Extension
"""

import base64

from q2_sdk.core.http_handlers.sso_handler import Q2SSORequestHandler, Q2SSOResponse, ResponseType
from .install.db_plan import DbPlan
from q2_sdk.models import saml_response
from q2_sdk.hq.models.sso_response import UserLevelConfig, UserLevelConfigList


class ExampleSSOHandler(Q2SSORequestHandler):

    VENDOR_CONFIGS = {
        # Assertion consumer service (ACS) URL. This URL will have the following format: <marketplace_base_url>/saml/login
        'ACS_URL': 'https://sptest.iamshowcase.com/acs',

        # Identity Provider id of who sent the message
        'IDP_ENTITY_ID': 'Your Site Here',

        # Service Provider id of who received the message
        'SP_ENTITY_ID': 'https://sptest.iamshowcase.com/',

        # Target URL or destination of the response
        'TARGET_DESTINATION': 'https://sptest.iamshowcase.com/'
    }

    #Whether the result is displayed in an overpanel or a new tab
    RENDER_IN_NEW_WINDOW = True

    DB_PLAN = DbPlan()

    def __init__(self, application, request, **kwargs):
        super().__init__(application, request, **kwargs)
        self.unique_user_identifier = None
        self.third_party_element_name = self.DB_PLAN.third_party_element_name

    async def default(self):
        self.unique_user_identifier = self.vendor_configs.get(self.third_party_element_name)
        user_config_list = None
        if not self.unique_user_identifier:
            self.unique_user_identifier = self.online_user.user_guid
            user_config_value = UserLevelConfig(self.third_party_element_name, self.unique_user_identifier)
            user_config_list = UserLevelConfigList(self.vendor_id, [user_config_value])

        response = await self.get_saml_response()

        bindings = {
            'url': self.vendor_configs.get('ACS_URL'),
            'saml_response': base64.b64encode(response).decode(),
            'relay_state': 'black'
        }

        html = self.get_template('sso.html.jinja2', bindings)

        response = Q2SSOResponse(ResponseType.HTML, response=html, user_level_config_list=user_config_list)
        return response

    async def get_saml_response(self):
        document = saml_response.Q2SamlResponse(
            issuer=self.vendor_configs.get('IDP_ENTITY_ID'),
            audience=self.vendor_configs.get('SP_ENTITY_ID'),
            destination=self.vendor_configs.get('TARGET_DESTINATION'),
            subject_principal=f'{self.online_user.first_name} {self.online_user.last_name} - {self.online_user.email_address}',
            attributes={
                'UUID': self.unique_user_identifier,
                'Email': self.online_user.email_address,
                'FirstName': self.online_user.first_name,
                'LastName': self.online_user.last_name,
                'Role': 'Online Customer',
                'CompanyID': ''
            }
        )

        #This returns a file path with both the certificate and the private key in one file
        cert = self.vault.get_certificate('example', self.hq_credentials)

        signed_document = document.sign(cert)

        self.logger.debug('SAML Response: %s', signed_document)

        return signed_document
<!DOCTYPE html>
<html lang="en">

<form method="post"
      action="{{url}}">
    <input type="hidden"
           name="SAMLResponse"
           value="{{saml_response}}" />

    <input type="hidden"
           name="RelayState"
           id="RelayState"
           value="{{relay_state}}" />
</form>

<script>
    var win = window.opener || window.parent;
    if (win) {
       var queryString = win.location.search;
       var params = new URLSearchParams(queryString);
       var q = params.get("RelayState");
       if (q) {
              document.querySelector('#RelayState').value = q;
       }
    }
    window.onload = function () { document.forms[0].submit(); }
</script>

</html>
from q2_sdk.core.install_steps import db_plan
# from q2_sdk.core.install_steps.uux_payload import UUXPayloadScript
# from q2_sdk.models.db_plan_shapes import UserPropertyFeature


class DbPlan(db_plan.DbPlan):

    def __init__(self):
        """
        It is often necessary to configure the database with information
        for an extension to run appropriately. This is your home to do so.

        Each of these attributes corresponds to a table (or set of tables) in the
        database. Instead of forcing all Antilles users to learn the
        database structure of Q2, we've opted for this handy abstraction.
        """

        super().__init__()
        self.third_party_element_name = "Session.UserSSOIdentifier"
        self.ui_text_prefix = 'ExampleSSO'  # Will be used for all self.ui_text_elements
        # self.send_account_list = True  # Populate self.account_list when HQ calls the extension
        # self.send_account_details = True  # Populate HADE data on accounts in self.account_list
        # self.payload_stored_proc = None  # Run a given Stored Procedure to manipulate the call shape from HQ
        # self.account_rights_bit_flag = 0  # Will only send accounts that have access level greater than this flag
        # self.insight_features = []  # Run a list of Insight API Features as part of the install (Custom stored procedures)
        # self.marketplace_features = []  # Run a list of Insight API Marketplace Features as part of the install (Custom stored procedures)
        # self.user_property_feature: UserPropertyFeature = UserPropertyFeature.FeatureGroupCustUser

        # self.api_stored_procs = [db_plan.ApiStoredProc()]
        # self.audit_actions = [db_plan.AuditAction()]
        # self.data_feeds = [db_plan.DataFeed()]
        # self.disclaimers = [db_plan.Disclaimer()]
        # self.gt_data_elements = [db_plan.GTDataElement()]
        # self.host_tran_codes = [db_plan.HostTranCode()]
        # self.products = [db_plan.Product()]
        # self.product_types = [db_plan.ProductType()]
        # self.report_info = [db_plan.ReportInfo()]
        # self.required_forms = [db_plan.RequiredForm()]
        self.third_party_data_elements = [db_plan.ThirdPartyDataElement(self.third_party_element_name, "a unique identifier for the user")]
        # self.ui_config_property_data = [db_plan.UIConfigPropertyData()]
        # self.ui_text_elements = [db_plan.UiTextElement()]
        # self.user_account_attributes = [db_plan.UserAccountAttribute()]
        # self.user_property_data_elements = [db_plan.UserPropertyDataElement()]
        # self.user_property_data = [db_plan.UserPropertyData()]
        # self.uux_payload = [db_plan.UUXPayload([UUXPayloadScript()])]
        # self.vendors = [db_plan.Vendor()]
        # self.vendor_config = [db_plan.VendorConfig()]
        # self.vault_info = [db_plan.VaultInfo()]
SSO-Specific Options
The SSO extension is based on the same design principles as other extension types, but there are a few specifics to keep in mind.
The SSOHandler class requires a Q2SSOResponse object to be returned from its default() method. This is a
simple tuple of a ResponseType object and a response string containing some data. The ResponseType can be either
ResponseType.LINK_OUT or ResponseType.HTML. If using ResponseType.HTML the response string is just a string
of HTML similar to what is returned by other SDK extensions. If using ResponseType.LINK_OUT, the
response type must be a URL. When you navigate to the extension via the nav menu, it will link to the URL you provided.
No matter which ResponseType this extension returns, it must be loaded in either a new tab or in an overpanel. This is
controlled by the RENDER_IN_NEW_WINDOW class flag. If the flag is set to True, the response is loaded in a new
tab. If False, it is loaded in an overpanel which appears from the bottom of the screen in the current tab.
Note
The overpanel loads an iFrame with its response. This option will not work if the service provider you are trying to integrate with does not support loading inside an iFrame.
If you take a look at the example SSO extension above, you will see a VENDOR_CONFIGS dictionary. SSO extensions
are located in the Q2_Vendor database table, whereas other SDK extensions are located in the Q2_Form table. This means
that SSO extensions can not use the standard Wedge address configs. If you need values stored in the database, use
VENDOR_CONFIGS. For most development purposes, vendor configs work exactly the same as Wedge address configs.
Define them in the extension, and they are populated into the database at install and can be changed.
Access them in your code using self.vendor_configs.get()
Another interesting bit of code to point out is how the self.unique_user_identifier value is being populated.
We are expecting this value in the self.vendor_configs, but if is not there, we use a multitenant safe unique identifier
for this user (self.sso_user.user_guid) and also create a UserLevelConfig object which is returned in the Q2SSOResponse.
This flow is utilizing Storing User Related SSO Data.
Note
This user_guid is a consistent but nonreversible hash of the UserID and environment key for this database. This is great for knowing your userId is unique no matter where you deploy, but is not appropriate if you need to infer the original userID from the hashed value.
Key Creation and Vault Storage
The first step to create a SAML assertion is creating a certificate/key pair. For a self-signed certificate, run:
$ openssl req -x509 -newkey rsa:2048 -keyout key.pem -out cert.pem -days 365 -nodes
Note
See https://stackoverflow.com/a/23038211 for more information about this command.
You will then be prompted for some parameters to populate the certificate.
This generates a self-signed 2048 bit RSA X.509 certificate and key pair. The certificate is written to cert.pem and the key is written to key.pem.
Note
The requirements of the certificate will vary based on the requirements of different service providers. A self-signed certificate may not be sufficient for all service providers.
For security reasons, we recommend not using the same certificate for both development and production.
The next step is to mock putting these certificates in Vault. Enter the following commands in the command line:
$ q2 vault create_dirs
$ q2 vault add_cert --name example --cert cert.pem --key key.pem
This creates a mock Vault storage system and stores our certificate and key in the appropriate place, allowing us to
access them via self.vault (preferred usage within an extension context) or vault.get_client() (outside the context of an extension) both in development and when deployed.
Check Secret Storage With Vault for a full guide
Building and Testing SAML
Once we have our private key and certificate, the next step is to create and test our SAML assertion using the Caliper SDK.
In the example, the SAML assertion is built using saml module, which is
a thin wrapper for the C libraries libxml and xmlsec. Feel free to use whatever SAML library you are comfortable
with. The SAML document and signature node are created using saml_response.py.
Lastly, we recommend using a demo assertion consumption service to ensure the SAML assertion is valid. We used this site in the example above: https://sptest.iamshowcase.com/
If you POST your SAML assertion to the site and the site recognizes it as valid SAML, you will see the below screen:
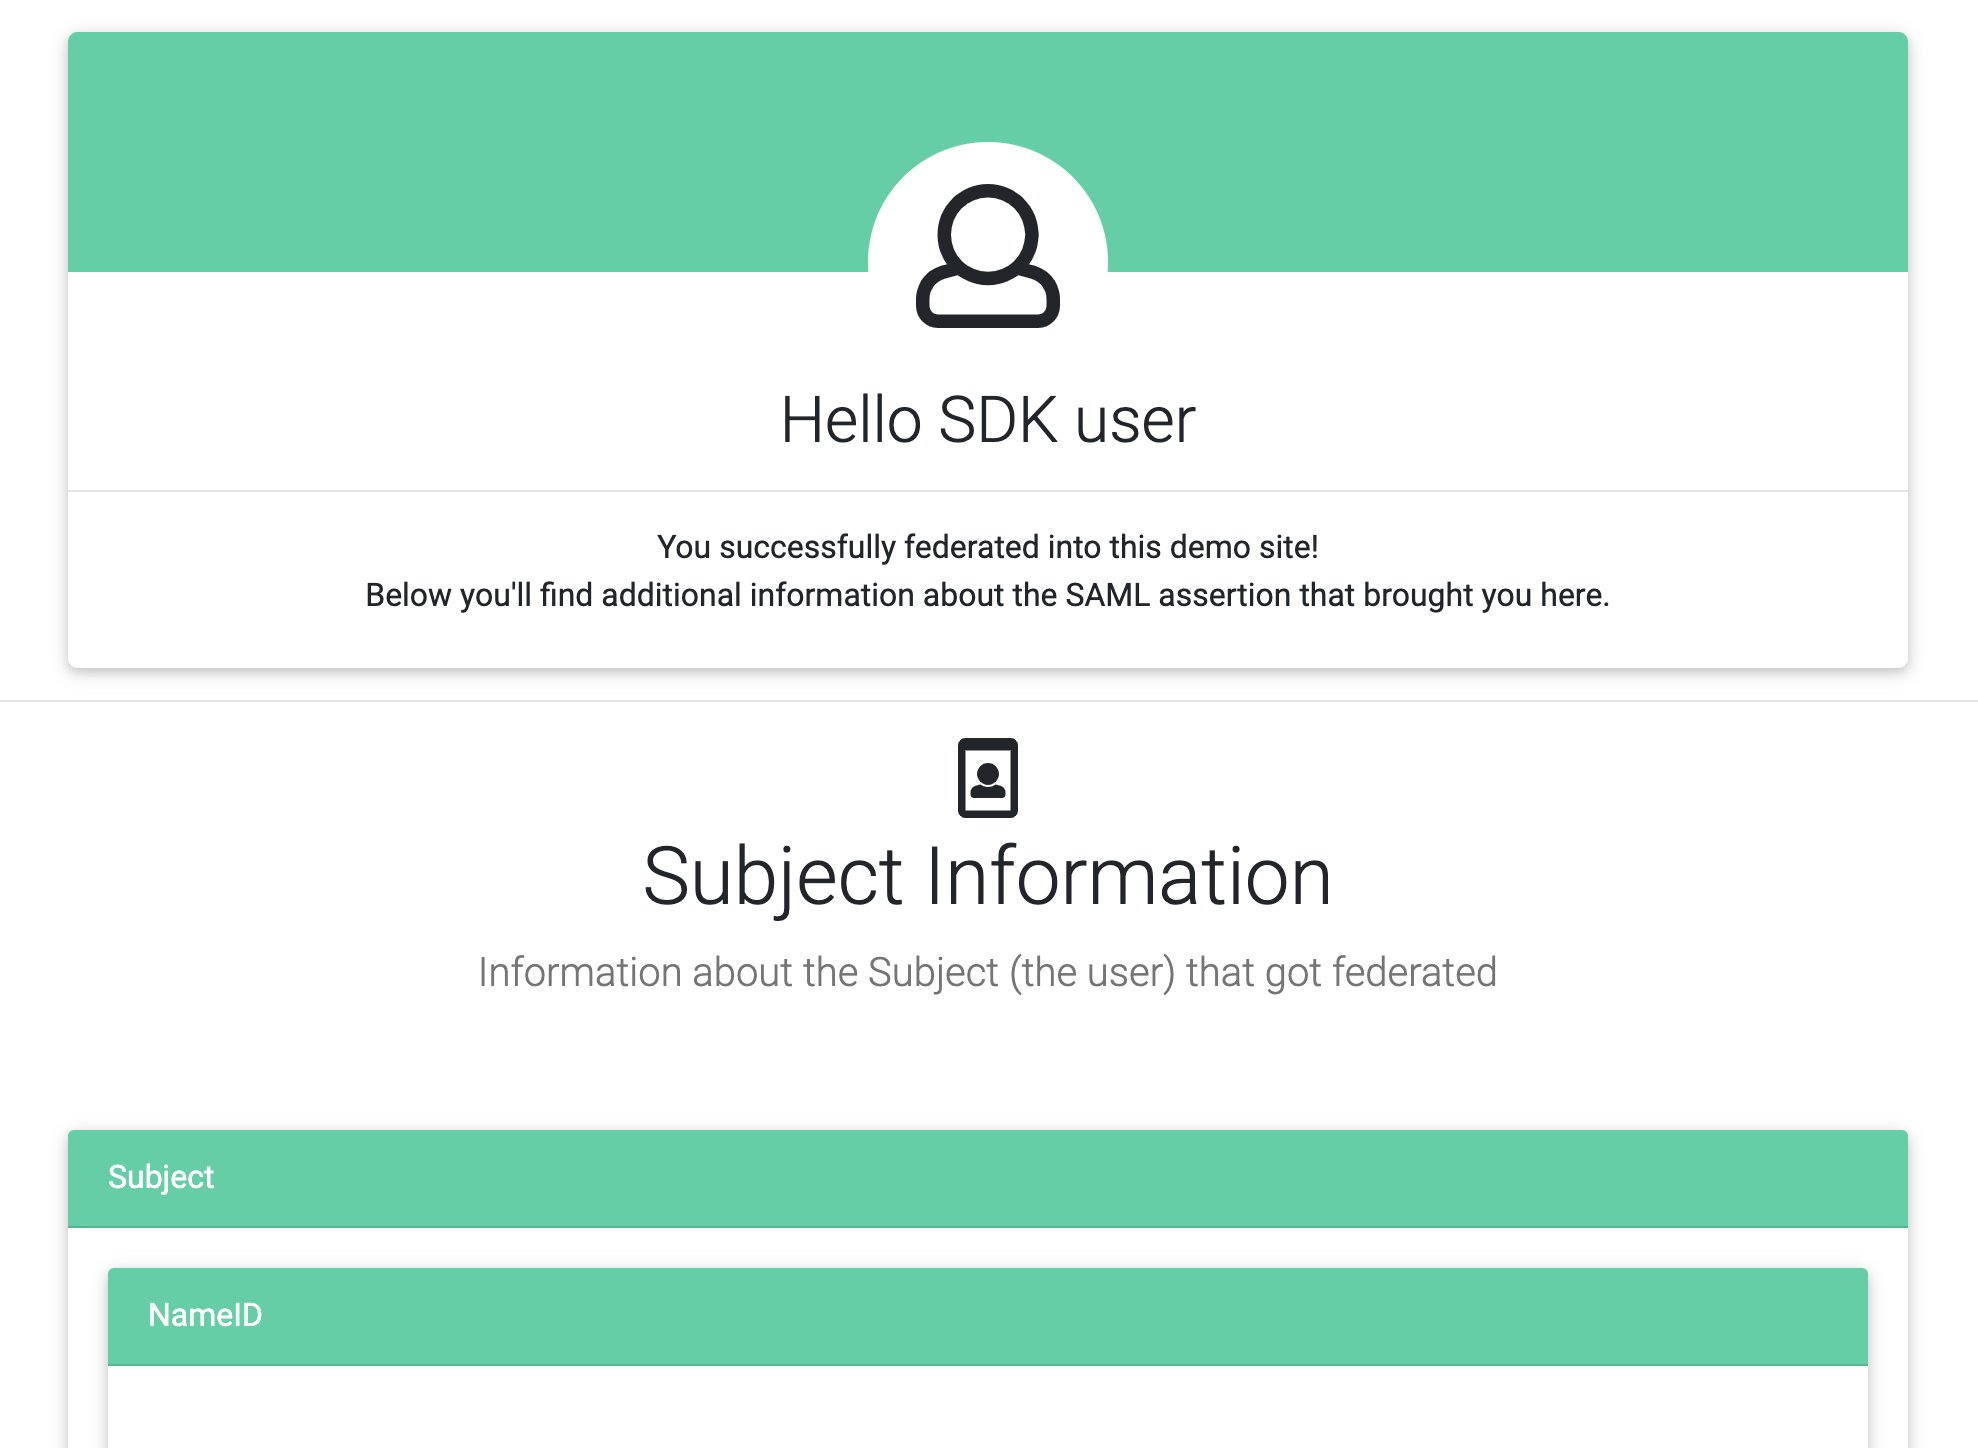
This page means that the site successfully parsed your SAML assertion and retrieved attributes. To prove that
data from your extension is represented, try changing the relay_state in extension.py to ‘blue’ and running
again.
This demo site is useful, but it does not verify the signature of the assertion– it simply trusts everything. To verify the signature use https://www.samltool.com/validate_response.php. This site also has many other extremely helpful tools used while building and testing the example above.
For more details about SSOs in Online Banking, read the guide here: (Single Sign Ons in Online Banking)