Webhooks
About webhooks
Webhooks allow you to subscribe to events that happen in q2developer.com. When an event occurs, we’ll send a HTTP POST payload to the webhook’s configured URL.
Events
When configuring a webhook, you can use the UI to choose which events to send you event payloads. Only subscribing to the specific events you plan on handling, limits the number of HTTP requests to your server. You can change the list of subscribed events anytime by going into the webhooks settings UI.
Ping Event
When you create a new webhook or update an existing webhook, we’ll send you a simple ping event to let you know you’ve set up the webhook correctly.
For more information about the ping event webhook payload, see the ping event.
Creating webhooks
Let’s go through the process of building out a own webhook-powered integration. In this tutorial, we’ll create an app order webhook that will be responsible for receiving the event and logging the output to the console.
Creating a webhook is a two-step process. You’ll first need to set up what events your webhook should listen to. After that, you’ll set up your server to receive and manage the payload.
Exposing localhost to the internet
For the purposes of this tutorial, we’re going to use a local server to receive webhook events from q2developer.com.
First of all, we need to expose our local development environment to the internet so q2developer.com can deliver events. We’ll use ngrok to do this.
ngrok is available, free of charge, for all major operating systems. For more information, see the ngrok download page.
After installing ngrok, you can expose your localhost by running ./ngrok http 8000 on the command line. 8000 is the port
number on which our server will listen for messages. You should see a line that looks something like this:
$ Forwarding https://3445-216-117-81-91.ngrok.io -> 127.0.0.1:8000
Make a note of the *.ngrok.io URL. We’ll use it to set up our webhook.
Setting up a webhook
To set up a webhook, go to q2developer.com my apps settings. From there, click Webhooks, then Add webhook.
Webhooks require a few configuration options before you can make use of them. We’ll go through each of these settings below.
URL
The payload URL is the URL of the server that will receive the webhook POST requests.
Since we’re developing locally for our tutorial, we’ll set it to the *.ngrok.io URL. For example,
https://3445-216-117-81-91.ngrok.io.
Secret
Setting a webhook secret allows you to ensure that POST requests sent to the payload URL are from q2developer.com.
You’ll receive the X-Q2-Signature-256 header in the webhook POST request.
For more information on how to use a secret with a signature header to secure your webhook payloads,
see Securing webhooks.
SSL Verification
If your “URL” is a secure site (HTTPS), you will have the option to configure the SSL verification settings. By default, q2developer.com verifies the SSL certificate of your website when delivering webhook payloads. SSL verification helps ensure that hook payloads are delivered to your URL endpoint securely. You have the option to disable SSL, but we recommend keeping Enable SSL verification selected.
Trigger
The trigger determines what events will be sent to your webhook. For this tutorial choose app order created.
Build a webserver to receive webhooks
We want our server to listen to POST requests. Because we’re using ngrok to expose our local environment,
we don’t need to set up a real server somewhere online, and can happily test out our code locally.
Let’s set up a little Python app to do something with the information. Our initial setup might look something like this:
#!/usr/bin/env python3

"""
Very simple HTTP server in python for logging requests.

Usage::
    python server.py [<port>]
"""
import logging
from http.server import BaseHTTPRequestHandler, HTTPServer


class SimpleHandler(BaseHTTPRequestHandler):

    def set_response(self):
        self.send_response(200)
        self.send_header('Content-type', 'text/html')
        self.end_headers()

    def do_GET(self):
        logging.info("GET request,\nPath: %s\nHeaders:\n%s\n", str(self.path), str(self.headers))
        self.set_response()
        self.wfile.write("GET request for {}".format(self.path).encode())

    def do_POST(self):
        content_length = int(self.headers['Content-Length'])
        post_data = self.rfile.read(content_length)
        logging.info("POST request,\nPath: %s\nHeaders:\n%s\n\nBody:\n%s\n",
            str(self.path),
            str(self.headers),
            post_data.decode()
        )

        self.set_response()
        self.wfile.write("POST request for {}".format(self.path).encode())


def run(server_class=HTTPServer, handler_class=SimpleHandler, port=8000):
    logging.basicConfig(level=logging.INFO)
    server_address = ('', port)
    httpd = server_class(server_address, handler_class)
    logging.info('Starting httpd...\n')
    try:
        httpd.serve_forever()
    except KeyboardInterrupt:
        pass
    httpd.server_close()
    logging.info('Stopping httpd...\n')


if __name__ == '__main__':
    from sys import argv

    if len(argv) == 2:
        run(port=int(argv[1]))
    else:
        run()
Start this server up.
$ python3 server.py
Let’s test this setup by receiving a ping event. In the q2developer.com my apps settings, click Webhooks, then edit the one you just created. Click “Update” without changing anything. You should see a message in your terminal that looks like this:
$ python3 server.py
INFO:root:Starting httpd...

INFO:root:POST request,
Path: /
Headers:
Host: 3445-216-117-81-91.ngrok.io
User-Agent: Q2-WebHooks/1.0.0
Content-Length: 312
Accept: */*
Content-Type: application/json; charset=utf-8
X-Forwarded-For: 216.117.81.91
X-Forwarded-Proto: https
X-Q2-Delivery: bfbff4d5-6051-4b6b-a601-49d1d88f4eaf
X-Q2-Event: Ping
X-Q2-Signature-256: q6e25Q2GBHJeKsICj/ZMs6QTKQiqrmNKnj9KQzz6xMU=
Accept-Encoding: gzip


Body:
{
    "hook_id": 8,
    "hook": {
        "id": 8,
        "active": true,
        "events": [
            "app-order-created"
        ],
        "updated_at": "2023-01-05T17:15:08.723774Z",
        "created_at": "2022-12-30T17:30:19.362659",
        "target_url": "https://3445-216-117-81-91.ngrok.io",
        "insecure_ssl": false,
        "content_type": "application/json"
    },
    "ping": {
        "description": "This is a ping event."
    }
}

127.0.0.1 - - [05/Jan/2023 11:15:11] "POST / HTTP/1.1" 200 -
Success! You’ve successfully configured your server to listen to webhooks. Your server can now process this information any way you see fit.
Testing webhooks
Now that you’ve configured your web server you can use q2developer.com webhooks view to provide some tooling for testing your deployed payloads.
Viewing the results
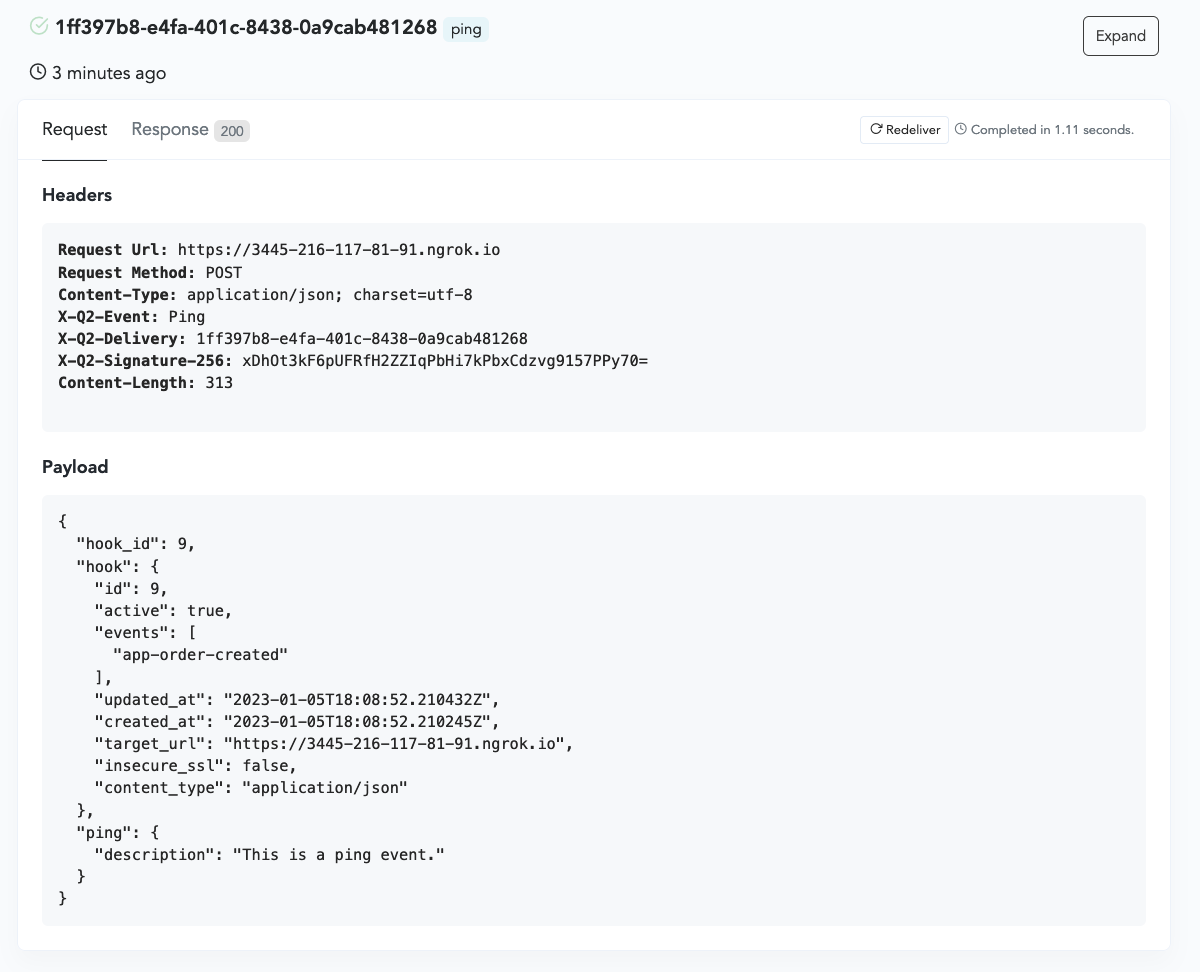
Requests
The webhook delivery view provides information on which Headers were sent by q2developer.com. It also includes details about the JSON payload.
Responses
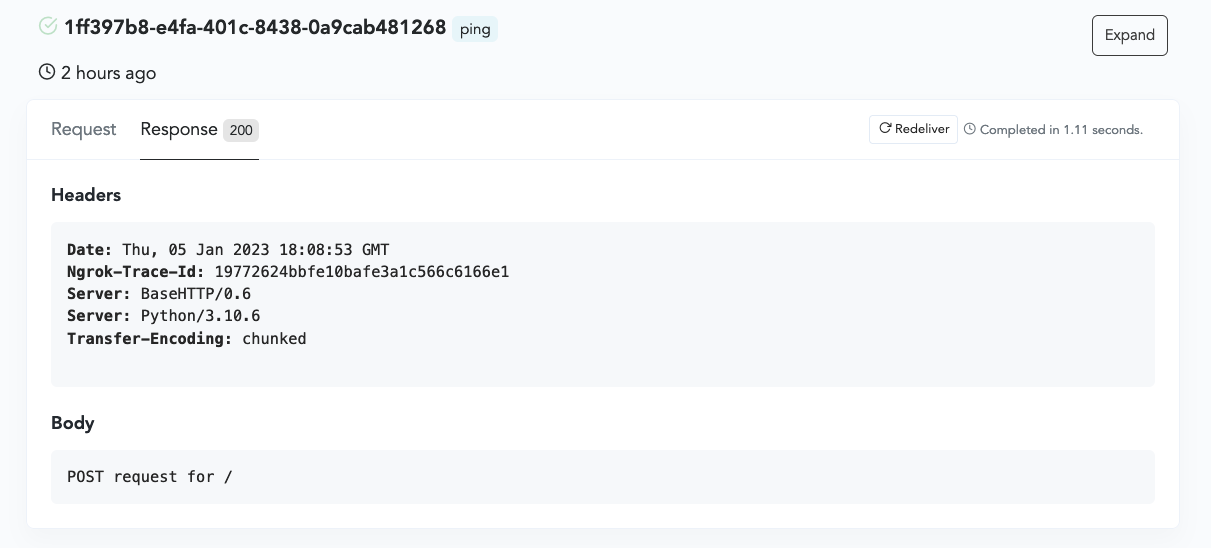
The response tab lists how your server replied once it received the payload from q2developer.com. This includes the status code, the headers, and any additional data within the response body.
Securing webhooks
Once your server is configured to receive payloads, it’ll listen for any payload sent to the endpoint you configured. For security reasons, you will want to limit requests to those coming from q2developer.com. You could do this by an allow list of known q2developer.com IP addresses, but a more convenient method is to use a secret and signature header and validate the payload.
Setting your secret token
You’ll need to set up your secret token in two places: q2developer.com and your server.
To set your token on q2developer.com:
Navigate to my apps settings where you set up your webhook.
Fill out the Secret textbox. Use a random string with high entropy (e.g., by taking the output of
python3 -c "import secrets ; print(secrets.token_hex(20))"at the terminal).

Export your secret token as we’ll use it in our next step.
$ export SECRET_TOKEN=YOUR-SECRET-TOKEN
Warning
Do not hardcode the token into your app!
Validating payloads
q2developer.com uses your secret to create a hash signature with each payload.
This hash signature is included with the headers of each request as X-Q2-Signature-256.
Let’s update our sample server to validate the signature header. We’ll use the hmac module to do this.
The intention is to calculate a hash using your SECRET_TOKEN environment variable, and ensure that the result matches
the hash from q2developer.com. q2developer.com uses an HMAC digest that is base64 encoded to compute the hash, so you could
reconfigure your server to look a little like this:
import base64
import hashlib
import hmac
import json
import logging
import os

from http.server import BaseHTTPRequestHandler

class SimpleHandler(BaseHTTPRequestHandler):

    def set_response(self, status_code=200):
        self.send_response(status_code)
        self.send_header('Content-type', 'text/html')
        self.end_headers()

    def do_POST(self):
        content_length = int(self.headers['Content-Length'])
        signature = self.headers['X-Q2-Signature-256']
        secret = os.environ["WEBHOOK_SECRET"]
        post_data = self.rfile.read(content_length)
        event = json.loads(post_data.decode())
        # compare_digest is used to prevent timing attacks
        if not hmac.compare_digest(signature, self.calculate_signature(post_data, secret)):
            logging.error("Invalid signature")
            self.set_response(401)
            self.wfile.write("Invalid signature".encode())
            return

        self.set_response()
        self.wfile.write(json.dumps(event, indent=True).encode())

    def calculate_signature(self, body, secret):
        # Calculate the body signature with HMAC-SHA256 and return the signature as a base64 encoded string
        hmac_hash = hmac.new(key=secret.encode(), msg=body, digestmod=hashlib.sha256).digest()
        return base64.b64encode(hmac_hash).decode()
Your language and server implementations may differ from this example code. However, there are a number of very important things to point out:
No matter which implementation you use you will be using the key of your secret token and your payload body.
Using a plain
==operator is not advised. A method like secure_compare performs a “constant time” string comparison, which helps mitigate certain timing attacks against regular equality operators.
Webhook events & payloads
Common Properties
- hook_id:
int
The ID of the webhook that triggered the event.- hook:
object
Webhook object. This will contain keys describing the configured webhook.
- id:
int
The ID of the webhook that triggered the event.- active:
boolean
Whether the webhook is active or not.- events:
array of strings
An array of events that will trigger the webhook.- updated_at:
string
The date and time the webhook was last updated.- created_at:
string
The date and time the webhook was created.- target_url:
string
The URL that the webhook will POST to.- insecure_ssl:
boolean
Whether the webhook will allow insecure SSL connections.- content_type:
string
The content type that will be delivered to the target URL.
HTTP Headers
HTTP POST payloads that are delivered to your webhook’s configured URL endpoint will contain several special headers:
Header |
Description |
|---|---|
|
Name of the event that triggered the delivery. |
|
A GUID to identify the delivery. |
|
This is the HMAC |
Example delivery
POST /payload HTTP/2

Content-Type: application/json; charset=utf-8
X-Q2-Event: Ping
X-Q2-Delivery: 5c293ab3-c463-426f-8701-3fb53522c3c7
X-Q2-Signature-256: hFsn83lB9a+y9Pti3q3s/hG1ClUNa0zpjrBOwB2Ra9Q=
Content-Length: 312

{
  "hook_id": 9,
  "hook": {
    "id": 9,
    "active": true,
    "events": [
      "app-order-created"
    ],
    "updated_at": "2023-01-05T22:20:16.358296Z",
    "created_at": "2023-01-05T18:08:52.210245",
    "target_url": "https://20ff-216-117-81-91.ngrok.io",
    "insecure_ssl": false,
    "content_type": "application/json"
  },
  "ping": {
    "description": "This is a ping event."
  }
}
app-order-created
This event occurs when a new order is created.
Body payload
- hook_id:
int
The ID of the webhook that triggered the ping.- hook:
object
Webhook object. This will contain keys describing the configured webhook.- order:
object
Order object. This will contain keys describing the order.
- app_id:
int
The id of the app.- app_slug:
string
The slug (short name) of the app.- point_of_contact_name:
string
The name of the point of contact for the order.- point_of_contact_email:
string
The email of the point of contact for the order.- signer:
object
Signer object. This will contain keys describing the user who performed the order.
- id:
string
The id of the signer.- name:
string
The name of the signer.- email:
string
The email of the signer.- company:
object
Company object. This will contain keys describing the company associated with the order.
- id:
string
The id of the company.- name:
string
The name of the company.- environments:
array
An array of environment objects. This will contain keys describing the environments the company is associated with.
- id:
string
The id of the environment.- type:
int
The type of the environment. 0 = production, 1 = staging/pte, 2 = development/sandbox- name:
string
The name of the environment.- aba:
string
The aba or routing number associated with the environment.- ordered_on:
string
The date the order was created.- ticket_id:
string
The key of the ticket referenced by the order.- terms:
object
Terms object. This will contain keys describing the terms agreed to.
- url:
string
The URL of the terms agreement.- terms_marketing:
object
Terms marketing object. This will contain keys describing the terms marketing.
- url:
string
The URL of the terms marketing agreement.
ping
This event occurs when you create or update a new webhook. The ping event is a confirmation from q2developer.com that you configured the webhook correctly.
Body payload
- hook_id:
int
The ID of the webhook that triggered the ping.- hook
object
Webhook object. This will contain keys describing the configured webhook.- ping:
object
- description:
string
A description of the ping event.