Ardent Extension Tutorial
Ardent is a Q2 technology that exposes digital banking APIs to the Internet. An Ardent extension is a powerful tool to create a new and publicly-available API that will be accessed outside the context of, and without requiring, an authenticated online banking session.
Warning
This part is very important, be sure to understand it completely. A new Ardent extension is very basic. When building an Ardent extension, there is no built-in authentication. Your extension should either be intended for unauthenticated users– such as user unlock, enrollment, or username lookup– or implement authentication for validating incoming requests. You can implement technologies such as SAML, HMAC, or request signing to do this.
The term “Ardent” is also often used to refer to several digital banking APIs powered by Ardent under the paths /mobilews, /v2, or /v3. These are session-based APIs that can be accessed from the frontend of your SDK extension by using the tecton.sources.requestPlatformData() function. These endpoints require
special handing for session and authentication, achieved by use of the requestPlatformData() function.
Tecton also has a specific function to access JSON APIs defined in your extension.py. This is discussed in more detail in AJAX Support. If you are looking to call an API
in your ``extension.py`` within the context of an end user’s session, such as those listed above, an Ardent extension is not the right tool. Please follow the AJAX Support documentation.
As stated, there are a number of important use cases for an Ardent extension. When you create an Ardent extension, it will expose your defined endpoints, alongside the /mobilews, /v2, and /v3 endpoints, and place them under the /sdk path for access.
For example, creating and installing an Ardent extension with the name validate_token will make available a new Ardent endpoint at /sdk/validate_token. This endpoint will receive all HTTP methods and all headers, and the full request body will be relayed to your extension.
Validate Token Ardent Extension
In this tutorial, we will create an Ardent extension that creates a JWT token inside a Tecton server side rendered extension and stores it for later retrieval under a randomly generated secret key, finally sending that secret key to the front end. From there, the secret key could be sent to a third-party web server. That secret key will then be passed into an Ardent extension to be validated, by checking that the HQ session stored is still valid and a JWT with user information returned. The end result of this tutorial is this example repo.
Warning
Some terminology similar to OIDC and OAuth will be used in this tutorial, but this is not a full or complete implementation of any of the OIDC workflows. These pieces do cover the basic building blocks by which an OIDC workflow could be implemented.
Let’s start by creating a new extension named userinfo with the q2 create_extension userinfo command and choosing the “Ardent (API) Extension” type:
    (.env) $ q2 create_extension userinfo
    What type of extension are you creating?

        1) Online (default)
        2) SSO (Third Party Integration)
        3) Ardent (API) <--------
        4) Q2Console (Backoffice)
        5) Central (Legacy Backoffice)
        6) Adapter
        7) Audit Action
        8) Custom Health Check
        9) Message Bus
        10) Caliper API Custom Endpoint
        11) Base Extension
This will generate a number of files that will be familiar if you’ve created extensions before. We will be focusing on the extension.py for this tutorial– the other files serve the
same purpose for Ardent extensions as they do for the other extension types.
For the purposes of this tutorial we will also create a create_token extension that is a Tecton server side rendered extension:
    (.env) $ q2 create_extension create_token
    What type of extension are you creating?

        1) Online (default) <---------
        2) SSO (Third Party Integration)
        3) Ardent (API)
        4) Q2Console (Backoffice)
        5) Central (Legacy Backoffice)
        6) Adapter
        7) Audit Action
        8) Custom Health Check
        9) Message Bus
        10) Caliper API Custom Endpoint
        11) Base Extension

    Please make a selection and press Return [1]: 1

    Select type of Online extension to generate

        1) Server Side Rendered (Default) <---------
        2) Client Side Rendered

    Please make a selection and press Return [1]: 1

    Select type of Online integration to generate

    1) Authenticated (Default)
    2) Unauthenticated
    3) External MFA

    Please make a selection and press Return [1]: 1
We won’t go into too much detail about the create_token extension– it is straightforward Tecton code. It will generate a JWT with some session data and store it in cache under a session-specific access token. There is one bit of indirection: putting the access token into the cache under the HQ session ID. This is done so that only a single access token will be generated per session. The access token will be sent to the browser and from there, it could be passed along to a third party.
This third party can then use this access token to make an API call back to the /userinfo endpoint to retrieve data about the end user for which the token was generated. The /userinfo endpoint will
return a JWT that is signed with the configured private key. Finally, the web server can validate the signature of the JWT by using the public key.
Create Token Extension
We will first generate a JWT with some user information:
Copy the following line to the imports:
$ import jwt
    REQUIRED_CONFIGURATIONS = {
        'jwt_secret': 'THIS_SHOULD_BE_A_PRIVATE_KEY_123456789123456789',
        'session_life': 60
    }

    async def default(self):
        # We get the HQ Auth Token and HQ URL to be used later to validate the session
        session = self.online_session.hq_auth_token
        hq_url = self.hq_credentials.reported_hq_url
        # Create the JWT token using a function.
        jwt_token = await self.create_jwt_token()

    async def create_jwt_token(self):
        # In order to create the JWT token we will first create a dict of the data we want
        cif = self.online_user.user_primary_cif
        if not cif:
            cif=self.online_user.customer_primary_cif
        jwt_data = {
            "FirstName": self.online_user.first_name,
            "LastName": self.online_user.last_name,
            "CIF": cif
        }
        # We will then use the jwt package to encode
        encoded_jwt = jwt.encode(jwt_data, self.config.jwt_secret, algorithm='HS256')
        return encoded_jwt
Note
pyjwt=~2.8 is included in SDK dependency from q2-sdk>=2.237.0
Once we’ve generated the JWT, we will generate a secret string and then store the token under it:
    async def get_access_token(self, hq_session, hq_auth_token, jwt_token, hq_url):
        # First create a random uuid for the access token
        # Be sure to add `import secrets` at the top of the file for this to work
        access_token = secrets.token_hex()
        # Now create the dictionary we will use later when the access token is validated.
        data = {
            "session" : hq_auth_token,
            "hq_url" : hq_url,
            "jwt_token": jwt_token
        }
        # Let's put the access token into cache to be retrieved via the validate token api endpoint later
        self.cache.set(hq_session, access_token, self.config.session_life)
        self.cache.set(access_token, data, self.config.session_life)

        return access_token
Add this get_access_token above to the default handler:
    async def default(self):
        # We get the HQ Auth Token and HQ URL to be used later to validate the session
        hq_auth_token = self.online_session.hq_auth_token
        hq_url = self.hq_credentials.reported_hq_url
        # Create the JWT token using a function.
        jwt_token = await self.create_jwt_token()
        access_token = await self.get_access_token(hq_session, hq_auth_token, jwt_token, hq_url)

        # Now we return HTML to the end user.  In this example, just printing out the
        # data.  In a real world workflow, we would likely call the third party and pass
        # the JWT and access token to them.
        template = self.get_template('index.html.jinja2',
                                    {
                                        'session': hq_auth_token,
                                        'url': hq_url,
                                        'access_token': access_token
                                    })

        html = self.get_tecton_form(
            "create_token",
            custom_template=template,
            routing_key="submit",
            hide_submit_button=True
        )

        return html
Next, Q2’s production environments run in two data centers. New sessions (in production) are distributed evenly across those two data centers.
In order to make sure the Ardent API calls return to the same data center that this token was generated in, we need to pass a cookie on the Ardent API requests.
To do that we inspect an environment variable NOMAD_DC. self.get_dc_cookie() generates the cookie string accordingly.
Q2’s Load Balances will use this cookie to route your Ardent API requests to the right server. Simply including it in the header of your Ardent API request is all you need, nothing additional in the Ardent handler itself.
Add this self.get_dc_cookie() above to to the default handler:
    async def default(self):
        # We get the HQ Auth Token and HQ URL to be used later to validate the session
        hq_auth_token = self.online_session.hq_auth_token
        hq_url = self.hq_credentials.reported_hq_url
        # Create the JWT token using a function.
        jwt_token = await self.create_jwt_token()
        access_token = await self.get_access_token(hq_session, hq_auth_token, jwt_token, hq_url)
        cookie = self.get_dc_cookie()

        # Now we return HTML to the end user.  In this example, just printing out the
        # data.  In a real world workflow, we would likely call the third party and pass
        # the JWT and access token to them.
        template = self.get_template('index.html.jinja2',
                                    {
                                        'session': hq_auth_token,
                                        'url': hq_url,
                                        'access_token': access_token,
                                        'cookie': cookie
                                    })

        html = self.get_tecton_form(
            "create_token",
            custom_template=template,
            routing_key="submit",
            hide_submit_button=True
        )

        return html
Now that we have generated and stored the JWT and access_token we can send this to the front end with a basic template
(saved into templates/index.html.jinja2):
    <div class="q2-row">
        <b>Current Session Data:</b>
    </div>
    <div class="q2-row">
        Session:  {{session}}<br>
        URL: {{url}}<br>
        JWT Token: {{jwt_token}}<br>
        Access Token: {{access_token}}<br>
        Cookie: {{cookie}}<br>
    </div>
Before moving on, we will add caching to the extension to have a consistent token for our session. If you wish to have a new token for each request, skip this part:
    async def default(self):
        # First let's get the HQ session
        hq_session = self.online_user.hq_session_id

        # Now let's look into cache and see if we already have a AccessCode for the HQ Session
        access_token = self.cache.get(hq_session)
        jwt_token = None
        dc_cookie = self.get_dc_cookie()
        if access_token:
            # We found an existing access_code.  Let's pull it from cache
            access_code_data = self.cache.get(access_token)
            hq_url = access_code_data.get('hq_url', None)
            session = access_code_data.get('session', None)
        else:
            # We get the HQ Auth Token and HQ URL to be used later to validate the session
            session = self.online_session.hq_auth_token
            hq_url = self.hq_credentials.reported_hq_url
            # Create the JWT token using a function.
            jwt_token = await self.create_jwt_token()
            # Now create the access token - which also stores the data in cache
            access_token = await self.get_access_token(hq_session, session, jwt_token, hq_url)

        # Now we return HTML to the end user.  In this example, just printing out the
        # data.  In a real world workflow, we would like call the third party and pass
        # the JWT and access token to them.
        template = self.get_template('index.html.jinja2',
                                     {
                                         'session': session,
                                         'url': hq_url,
                                         'JWT Token': jwt_token,
                                         'access_token': access_token,
                                         'cookie': dc_cookie['cookie']
                                     }
        )

        html = self.get_tecton_form(
            "create_token",
            custom_template=template,
            routing_key="submit",
            hide_submit_button=True
        )

        return html
With our create_token extension complete we are ready to test it by installing it and add it to the navigation menu.
Use the standard q2 install and q2 add_to_nav commands.
The next piece of the tutorial is the userinfo Ardent extension. This piece is simpler:
it will pull the access token out of the Authorization header and use it to lookup the JWT from the cache. It will also
make a request to HQ to ensure the session that the token was created for is still active.:
    async def get(self):
        token=self.request.headers["Authorization"].replace('Bearer ', '')
        data = self.cache.get(token)
        success = False
        if data:
            self.logger.debug(f'data: {data}')
            hq_url = data['hq_url']
            session = data['session']
            jwt = data['jwt_token']

            ## Test HQ Session
            hq_creds= HqCredentials(
                hq_url = None,
                csr_user = None,
                csr_pwd = None,
                aba = None,
                auth_token=session,
                reported_hq_url=hq_url
            )
            get_ver_po = GetHqVersion.ParamsObj(self.logger, hq_creds)
            result = await GetHqVersion.execute(get_ver_po)
            success = result.success
        if success:
            self.set_status(200)
            self.write(jwt)
        else:
            self.set_status(403)
            self.write("Fail")
Attention: The installation of the Ardent extension requires a q2 bounce_stack after installation. It will not be added to nav, so q2 add_to_nav is not needed.:
    (.env) $ q2 install
    Which Extension would you like to install?

        1) userinfo <----------------
        2) create_token

    Please make a selection and press Return: 1


    (.env) $ q2 bounce_stack
    Bouncing the stack is time consuming and similar results can often be achieved by running `q2 invalidate_hq_cache`. Are you sure you want to proceed and bounce the stack? [Y/n] y
Bouncing the stack takes a few minutes. Once uux.aspx successfully loads we can now test our extensions end-to-end.
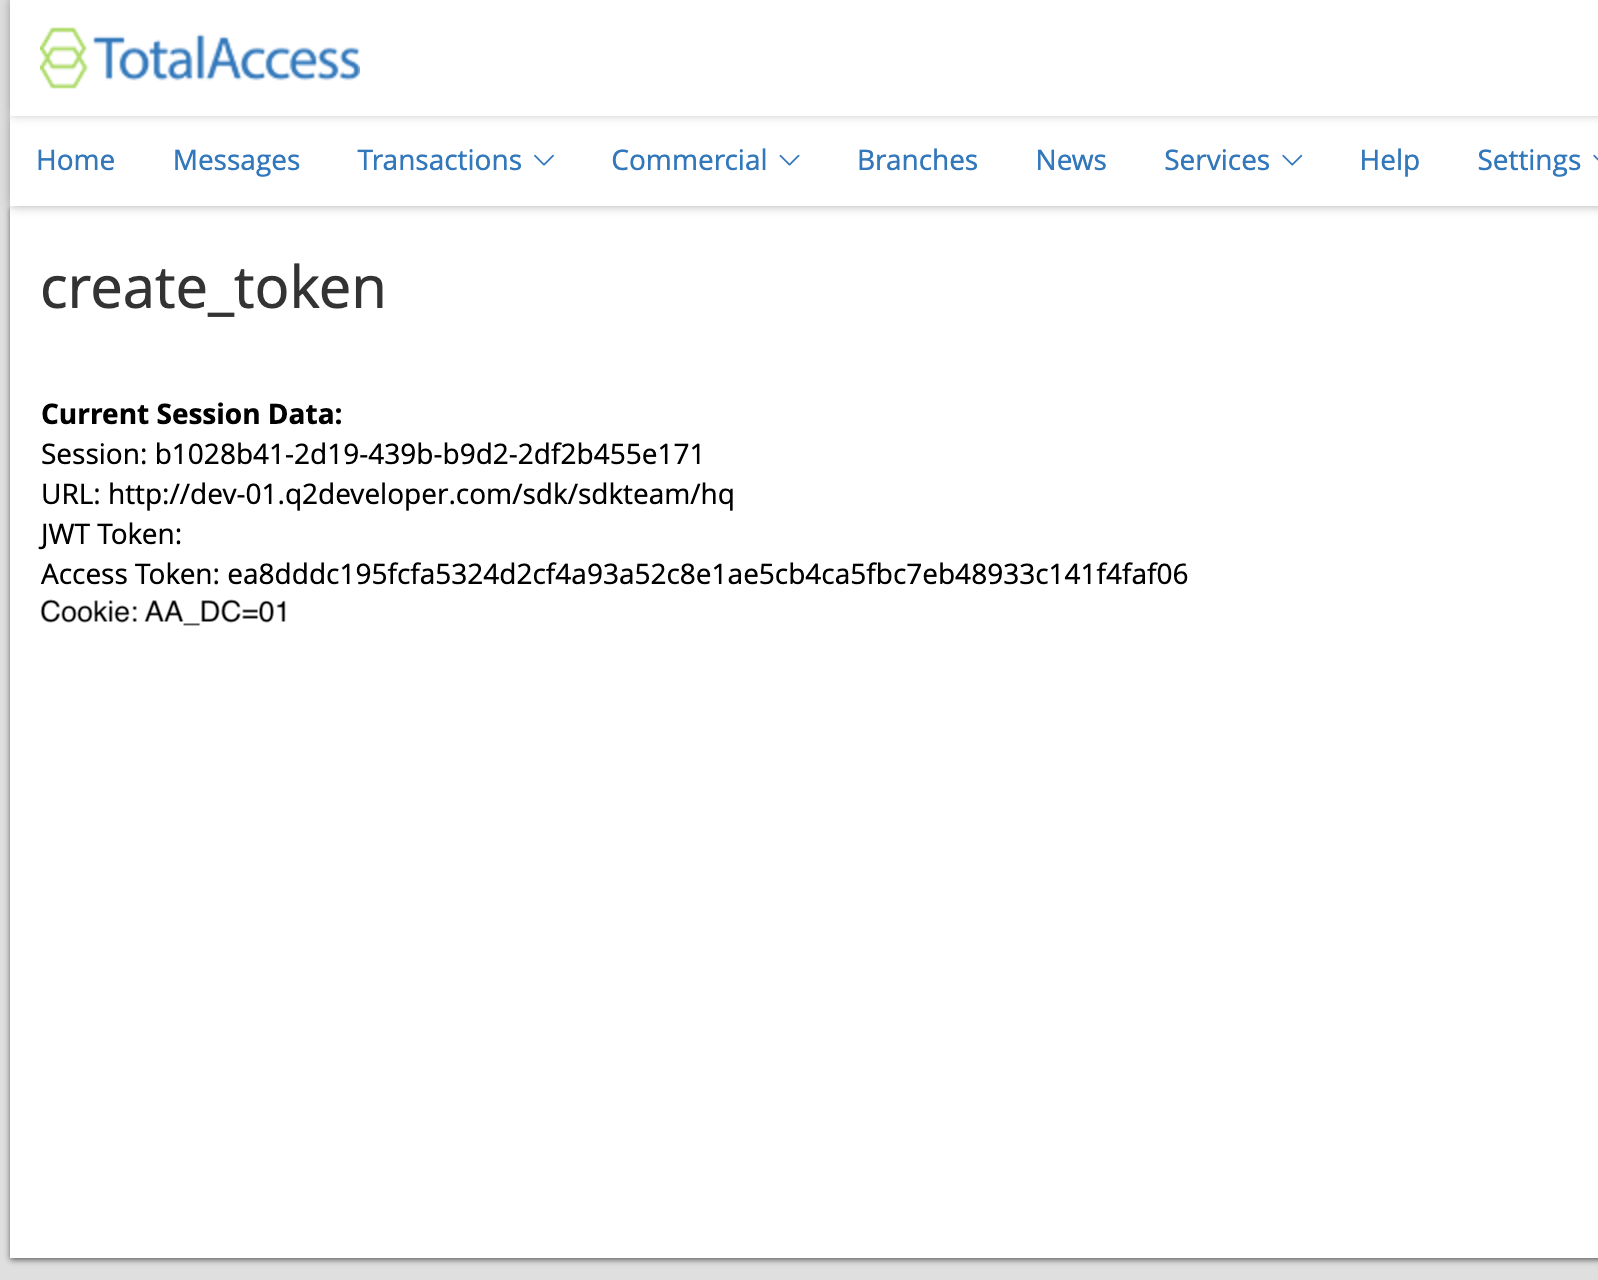
Log into Online banking and navigate to the create_token extension.
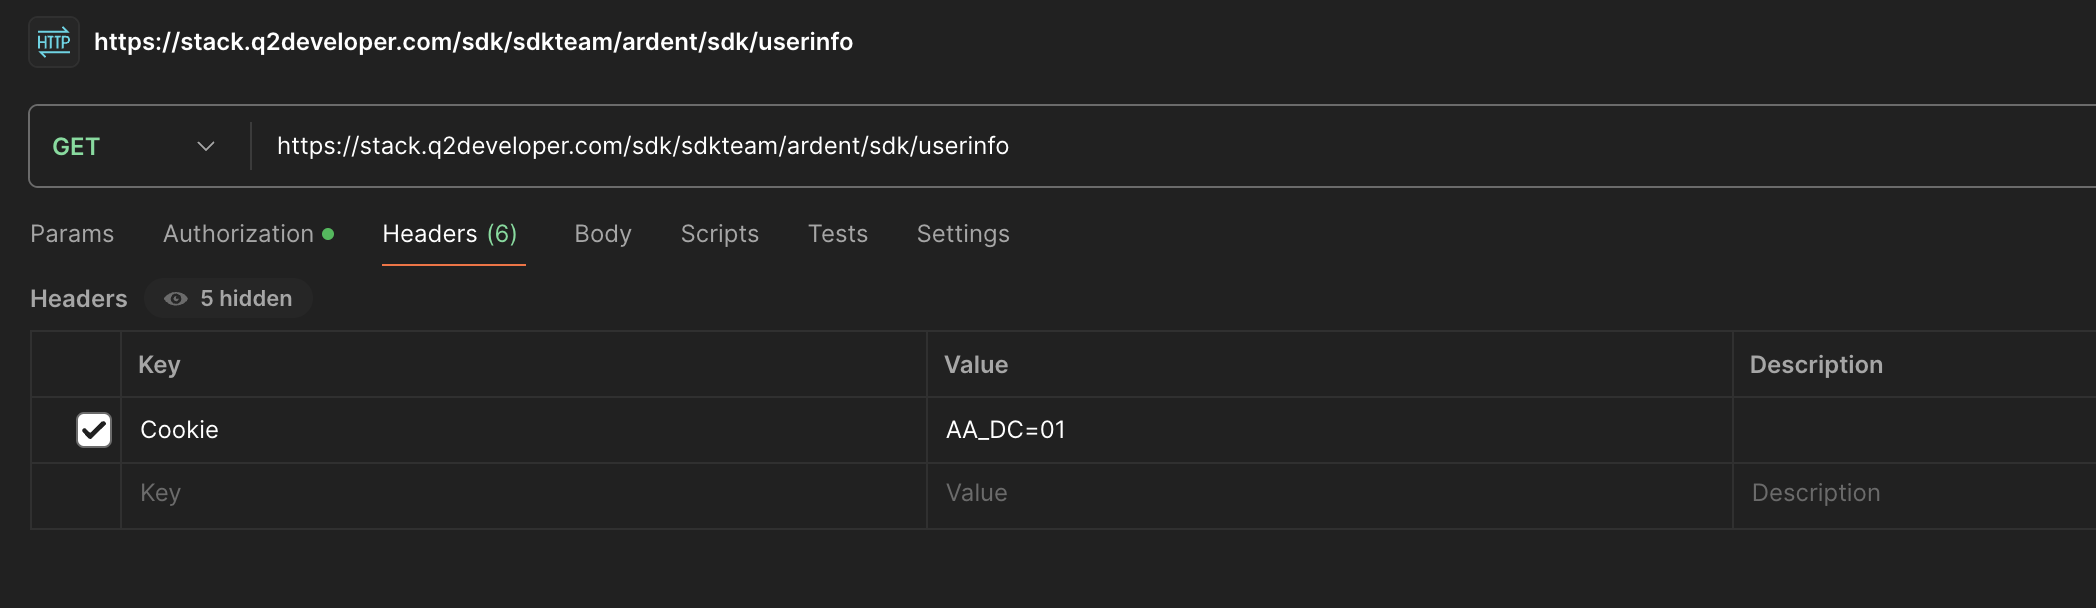
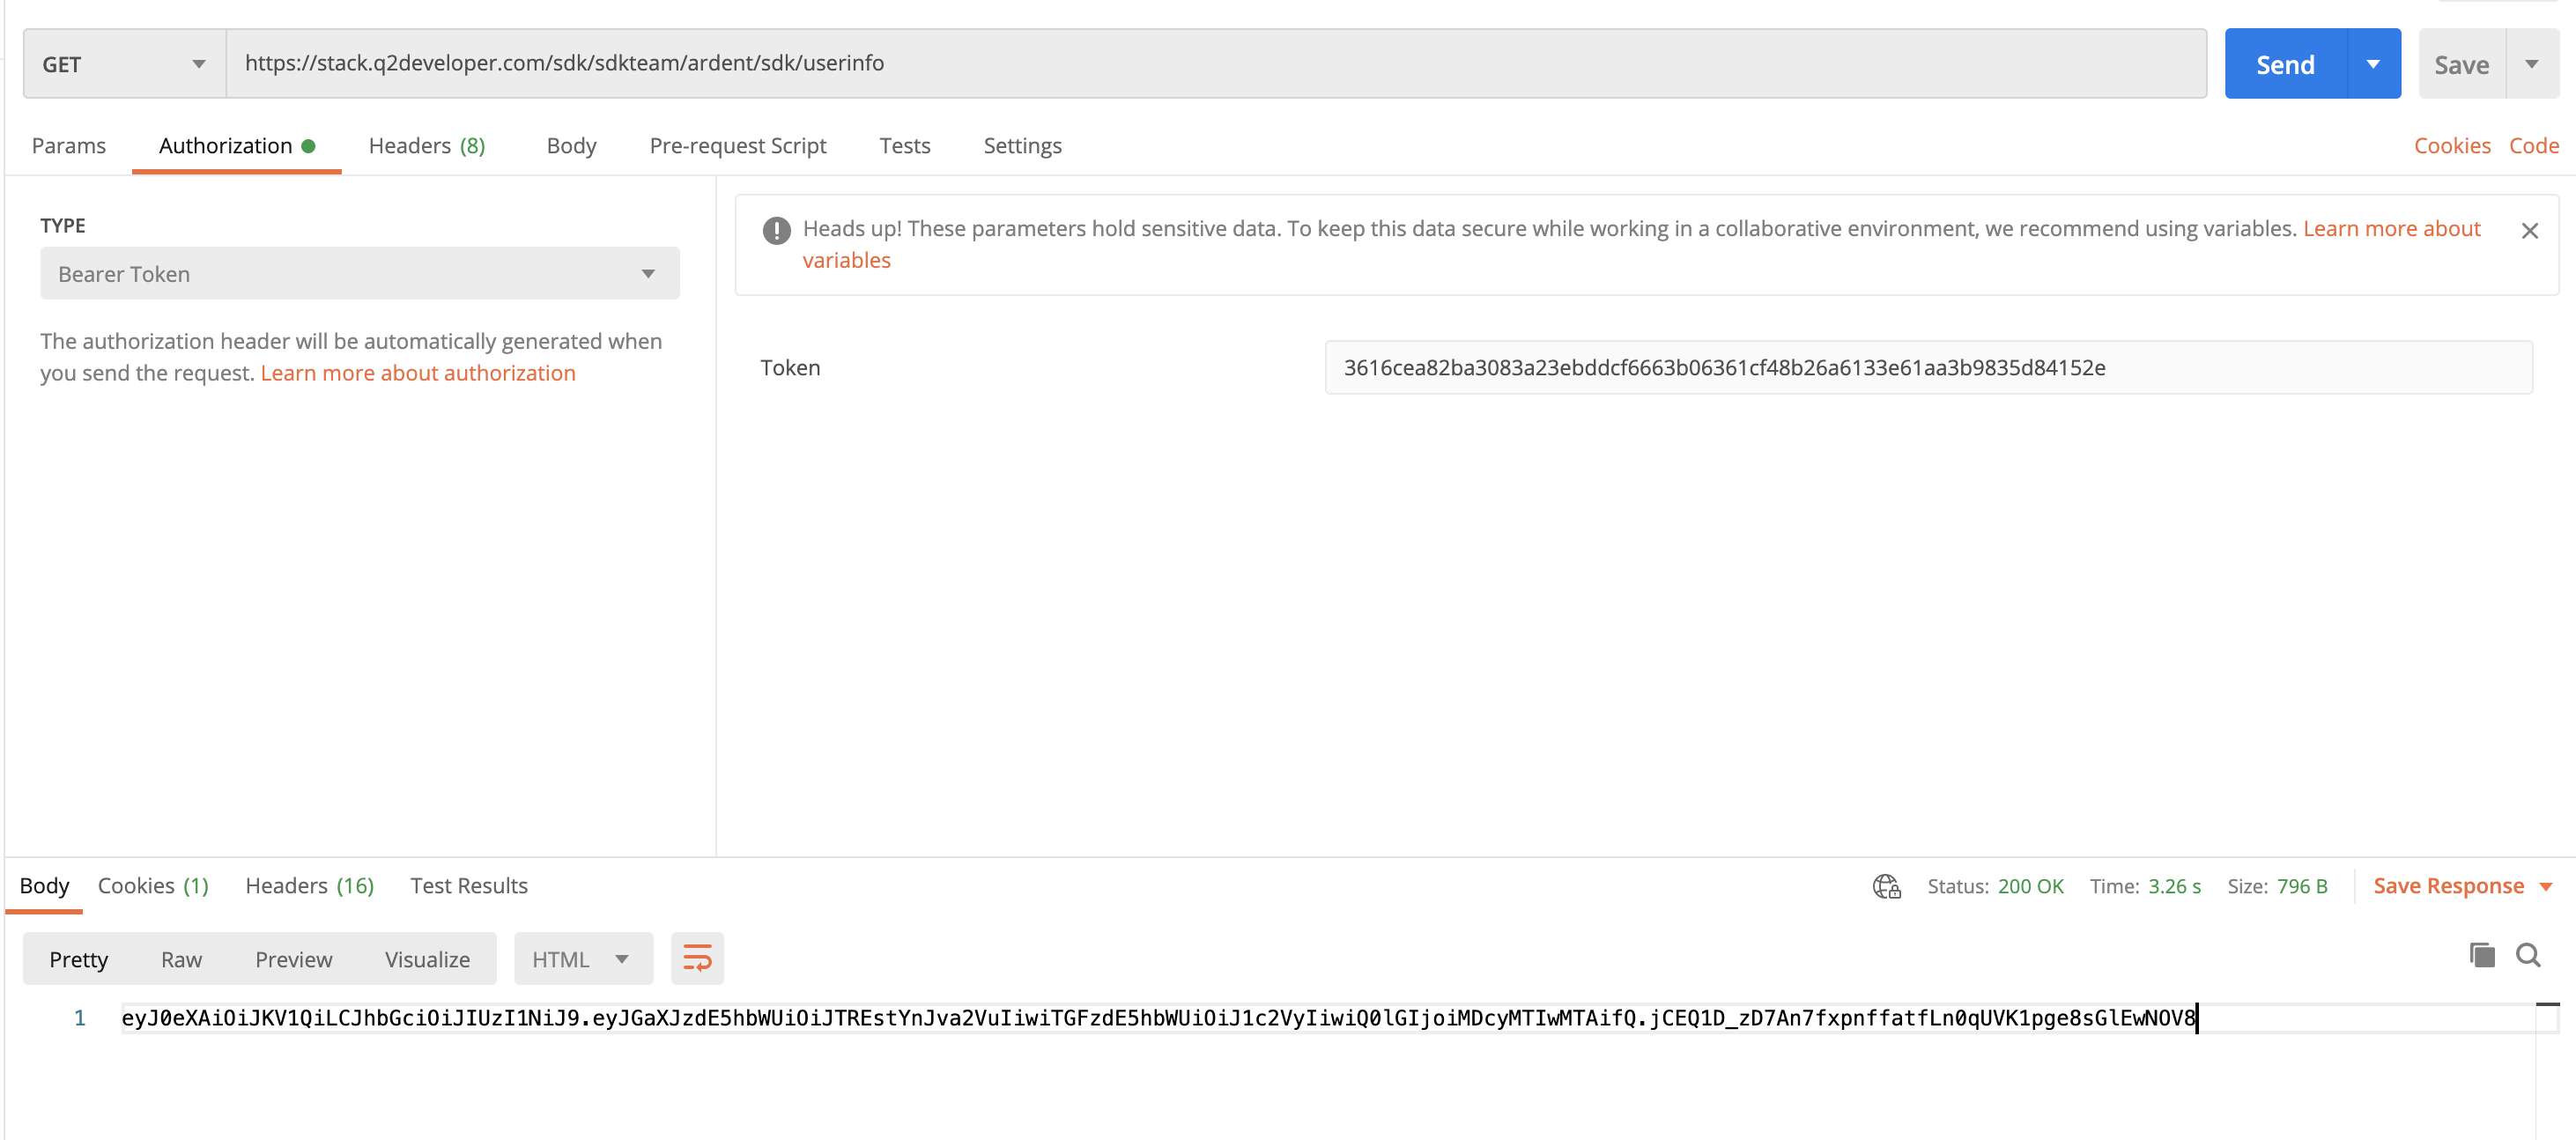
Copy the generated Access Token and use your API test tool of choice (curl, Postman, etc) to try making a GET call to your /userinfo extension.
Be sure to include the cookie value as well in the Cookie header.
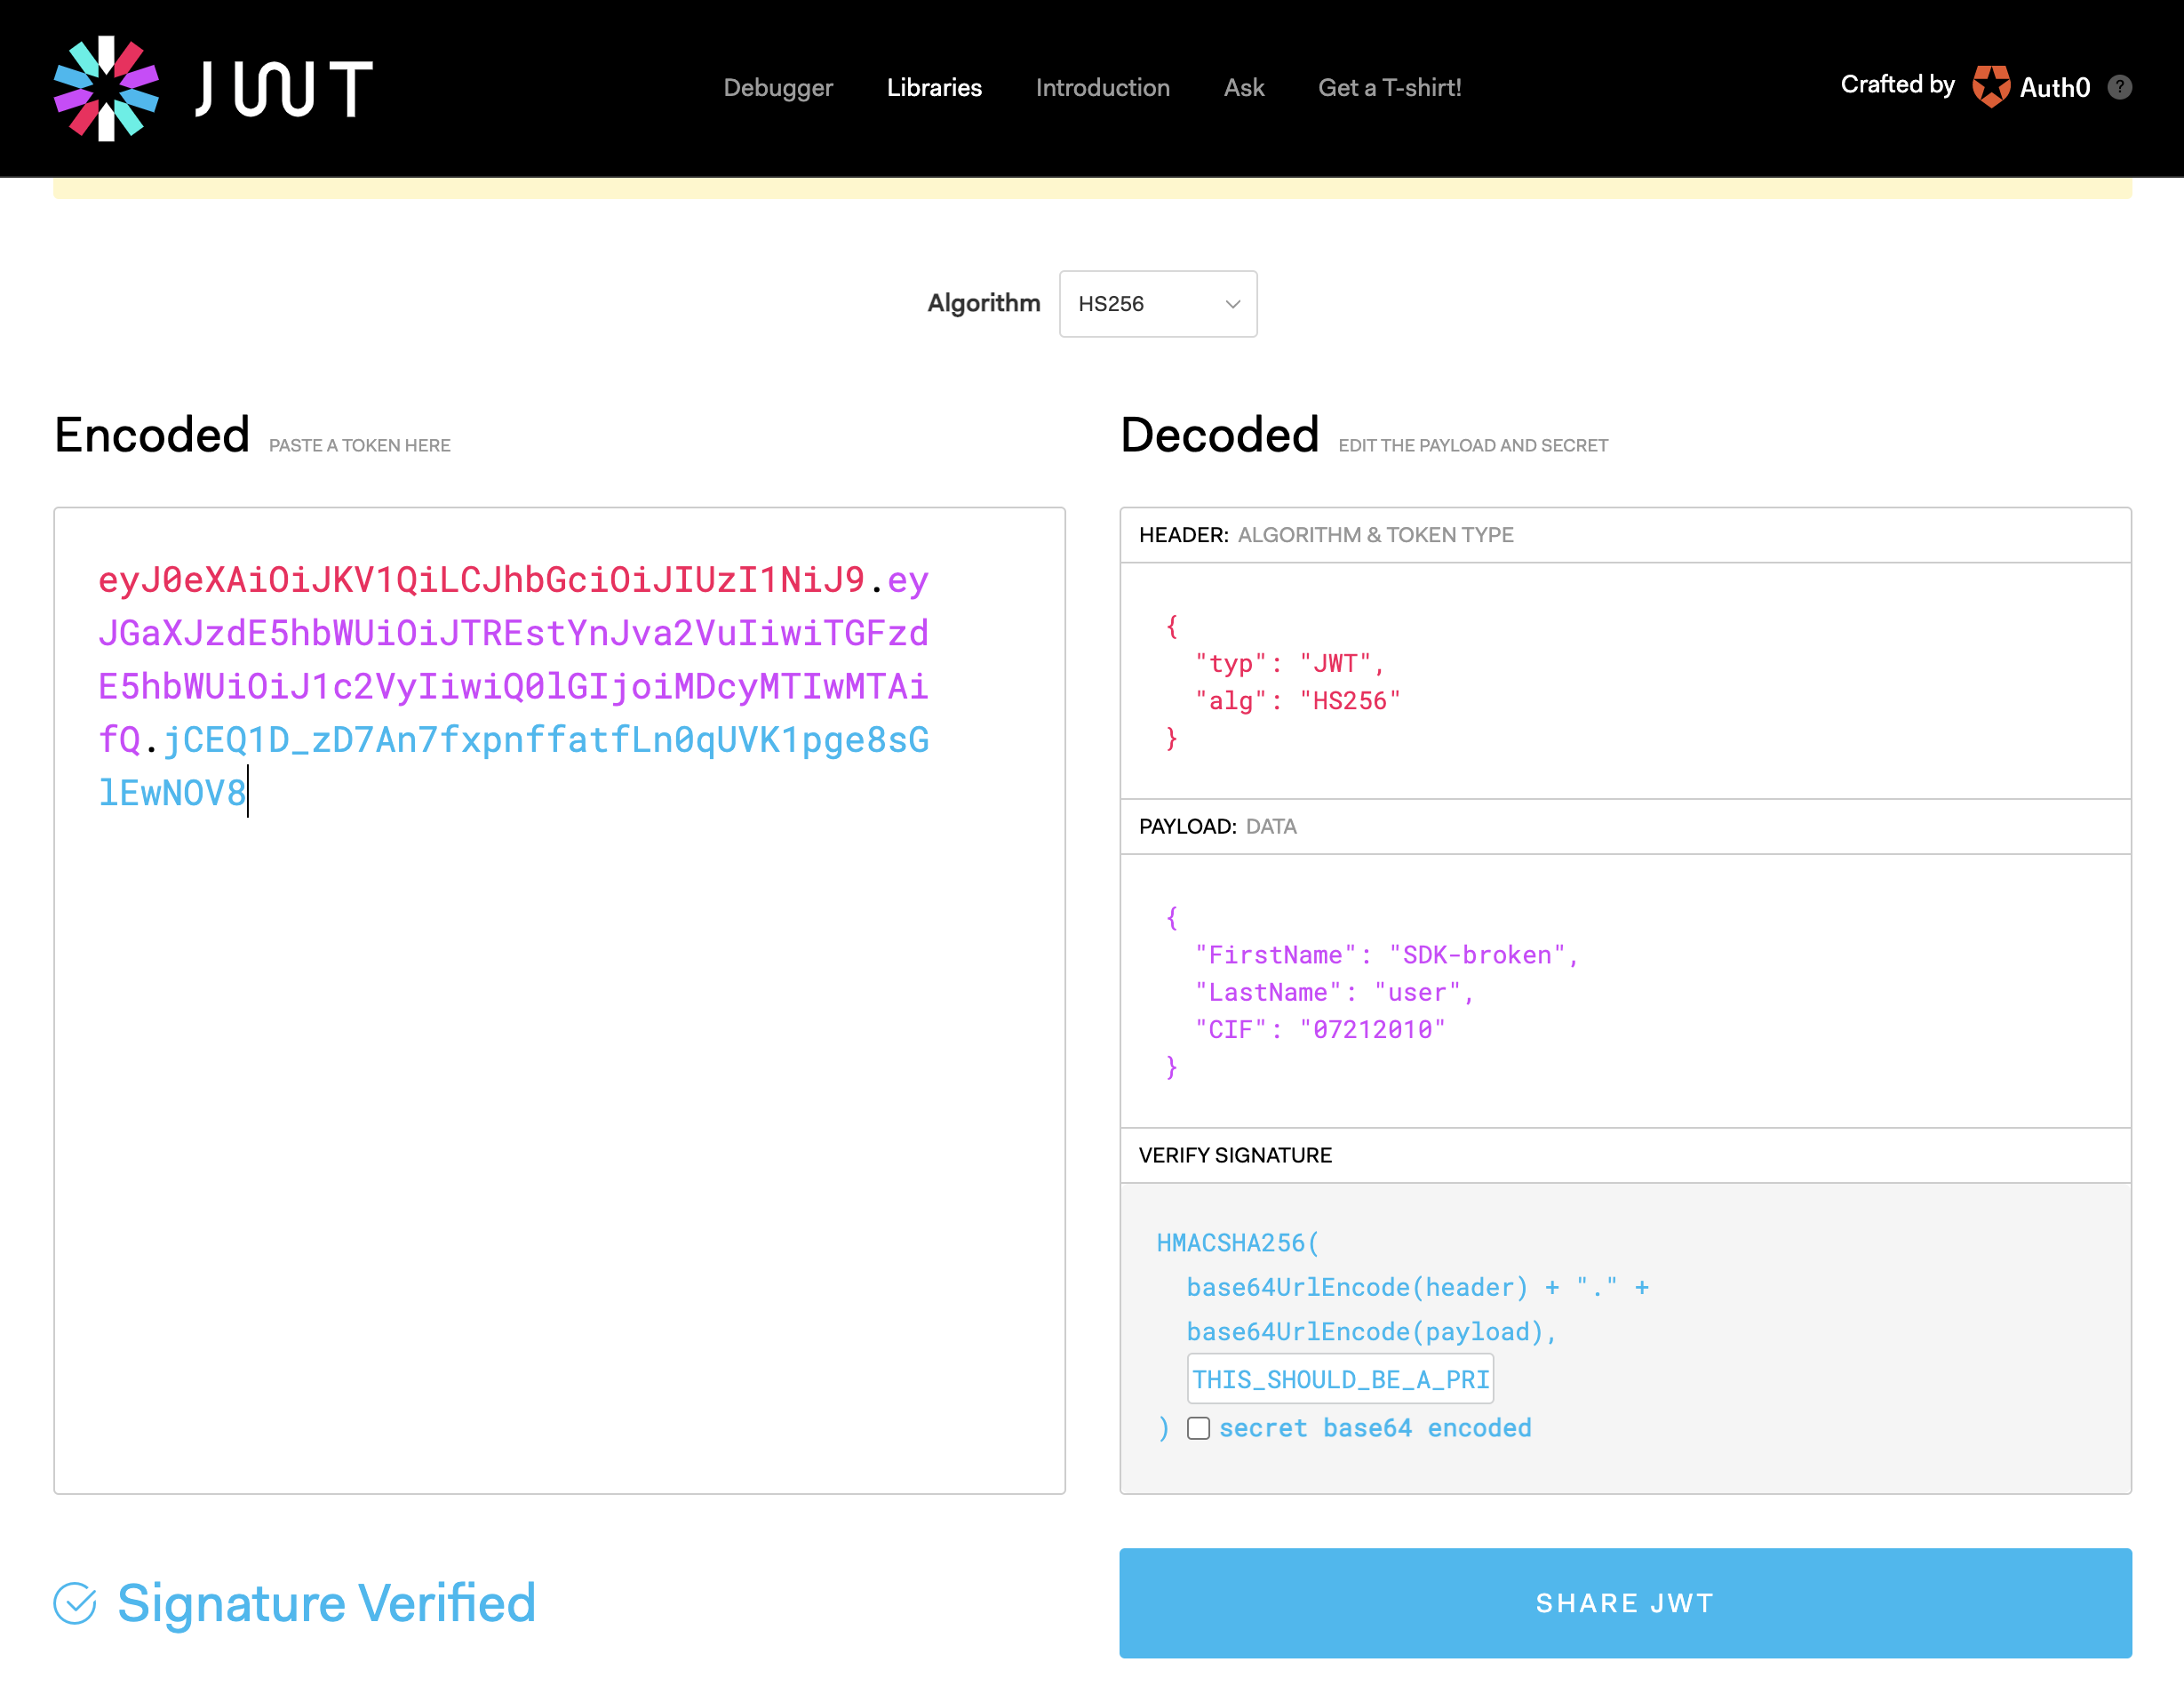
If all is successful you should get a signed JWT back:
You can inspect your JWT by using a tool like https://jwt.io/#debugger-io :