Instant Payments Adapter Extension Tutorial
Instant Payments (IP) are a relatively new way of transferring money (in the United States). Rather than a three day delay through the existing Automated Clearing House (ACH) system, Instant Payments allow the near instantaneous moving and settling of funds. Other Peer to Peer solutions have existed for several years that to various extents ride these same rails, but at the banking institution level, IP is just getting started.
From the Caliper SDK perspective, we treat IP like any other adapter type. There are lots of tables involved in the database, but we do our best to abstract these away and give you a clean and easy interface to test out your integration. Let’s build an extension and test it out!
The InstantPayments adapter type is invoked through the UUX interface’s Payment Requests Page (more on setting this up below):
LandingPage Widget:
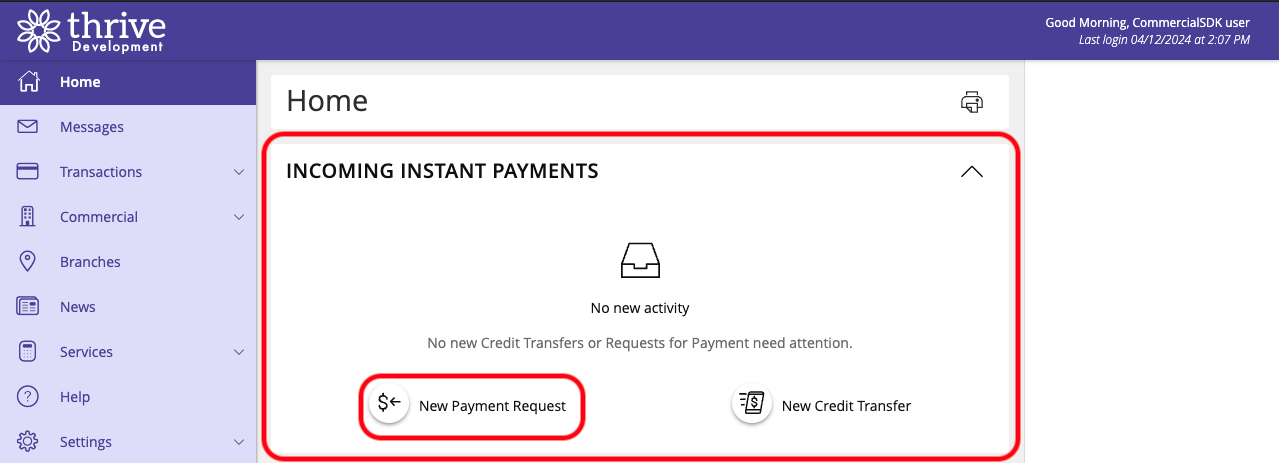
Instant Payments page:
We are going to create and register an extension such that sending a Payment Request (or a Credit Transfer) will hook into your code, letting us control where that IP data goes, and report back whether or not it was successful. Either way, we expect the UUX interface to update with the success/failure information.
Prerequisites
Important
As this is all quite new, the SDK sandbox stacks are not all set up to support this. If you are developing a realtimepayment integration and these prerequisites result in errors, before moving on to the Create the Extension step, please reach out to the Caliper SDK team and we can get you set up. Thanks for helping us harden our stacks!
Note
While Instant Payments (IP) is the generic name for this flow, an older name was Realtime Payments. As such, the tables in the database are prefixed with RTP
First, we need to make sure IP is enabled in your test stack. This will seed the database with all the appropriate data to start your development. It will also enable IP for one or more groups. Here we’re going to enable it for the default groups, Retail Users and Commercial Users (groups 1 and 2 in this test database):
$ q2 sandbox instant_payments enable

Ensuring Adapter tables are seeded
Ensuring all InstantPayments DataTypes are seeded in Q2_RTPDataType
Ensuring there is a dummy vendor in Q2_RTPVendors for null state
Ensuring all RequestTypes are seeded in Q2_RTPRequestTypes
Setting system defaults
Setting defaults per group
Which groups would you like to enable for?

    1) [x] Retail Users
    2) [x] Commercial Users
    3) [ ] Merchant Verification
    4) [ ] Q2 Test Group - DO NOT DELETE
    5) [ ] Q2 Retail Default
    6) [ ] Q2 Retail ExternalTransfer
    7) [ ] Q2 Retail PositivePay
    8) [ ] Q2 Retail MobileCapture

Select a number to toggle. 'a' for All. 'b' to set all to Blank. Leave empty to continue:
Updating for group: 2
Invalidating HQ
Next, this type of adapter needs an additional internally created Q2 library called
q2msg. We can configure that with the sandbox command, too:$ q2 sandbox q2msg generate_keys # Ensure we can decode messages from HQ
Finally, let’s ensure all the sql stored procedures for local testing are up to date:
$ q2 setup_db
Note
All of these sql files are marked as dev only and will not work in a datacenter environment yet.
Create the Extension
Now that the prerequisites are out of the way, we can get working on your extension itself. Thankfully, there’s not much to it!
Generate the boilerplate using the
q2 create_extensioncommand:$ q2 create_extension New Extension Name: PayMeNow What type of extension are you creating? 1) Online (default) 2) SSO (Third Party Integration) 3) Ardent (API) 4) Q2Console (Backoffice) 5) Central (Legacy Backoffice) 6) Adapter <------------- 7) Audit Action 8) Custom Health Check 9) Message Bus 10) Caliper API Custom Endpoint 11) Base Extension Please make a selection and press Return [1]: 6 Adapter Select adapter type to generate 1) Account Details 2) Authentication Token 3) Check Image 4) Domestic Wire 5) Deposit Item Image 6) FX Rate 7) Instant Payments <-------- 8) International Wire 9) Remote Deposit 10) Statement ImageRegister the active adapter for instant payments in the stack:
$ q2 install PayMeNow
We currently support two types of Instant Payment calls: RequestForPayment and CreditTransfer.
RequestForPayment: Requesting money from another entity
CreditTransfer: Sending money to another entity
By default, your extension is generated with a generic “successful” response to each type:
async def handle_rtp_request(self, request: RequestForPaymentRequest) -> InstantPaymentsResponse:
    """Using the information provided in `request` param, return a InstantPaymentsResponse"""
    success = True
    external_id = '123P'
    return InstantPaymentsResponse(success, external_id)

async def handle_credit_transfer_request(self, request: CreditTransferRequest) -> CreditTransferResponse:
    """Using the information provided in `request` param, return a CreditTransferResponse"""
    success = True
    external_id = '456C'
    return CreditTransferResponse(success, external_id)
There’s no need to change that for the moment. Let’s see how it works in the next step.
Testing the Extension
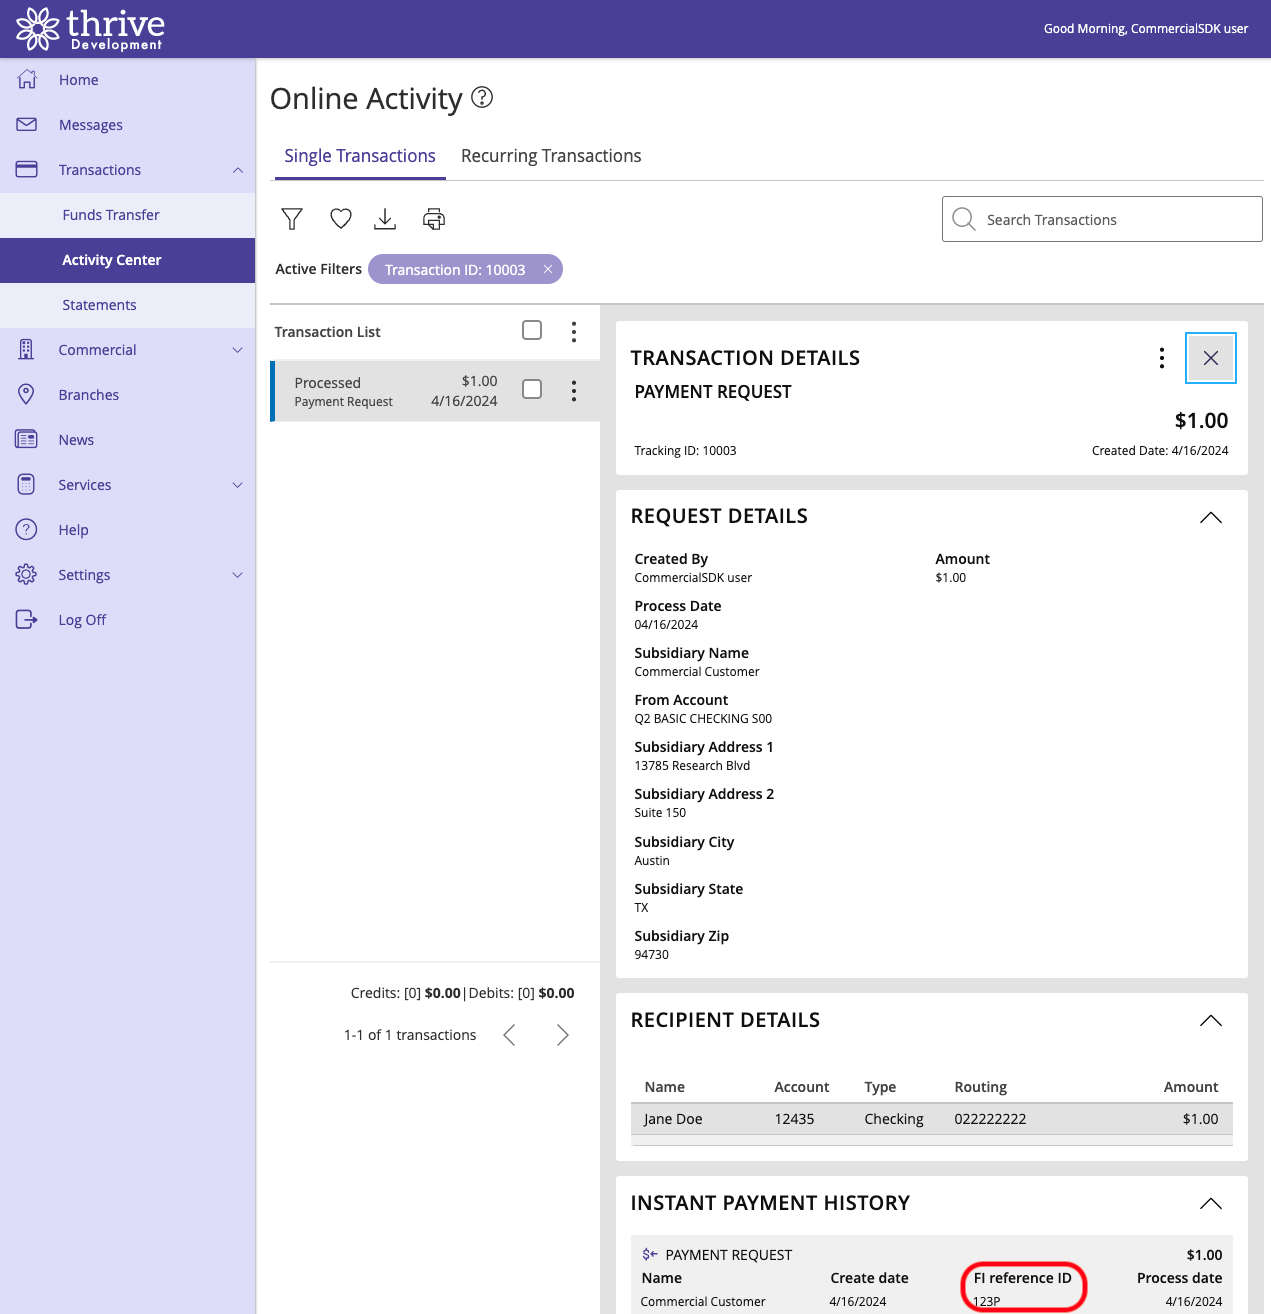
From the code above, we should be see a successful flow of either request type right away, and we’ll know it worked based on the external_id that will show up later in the process. ‘123P’ for RealtimePayment or ‘456C’ for CreditTransfer.
Let’s try it out! Boot up your server:
$ q2 run
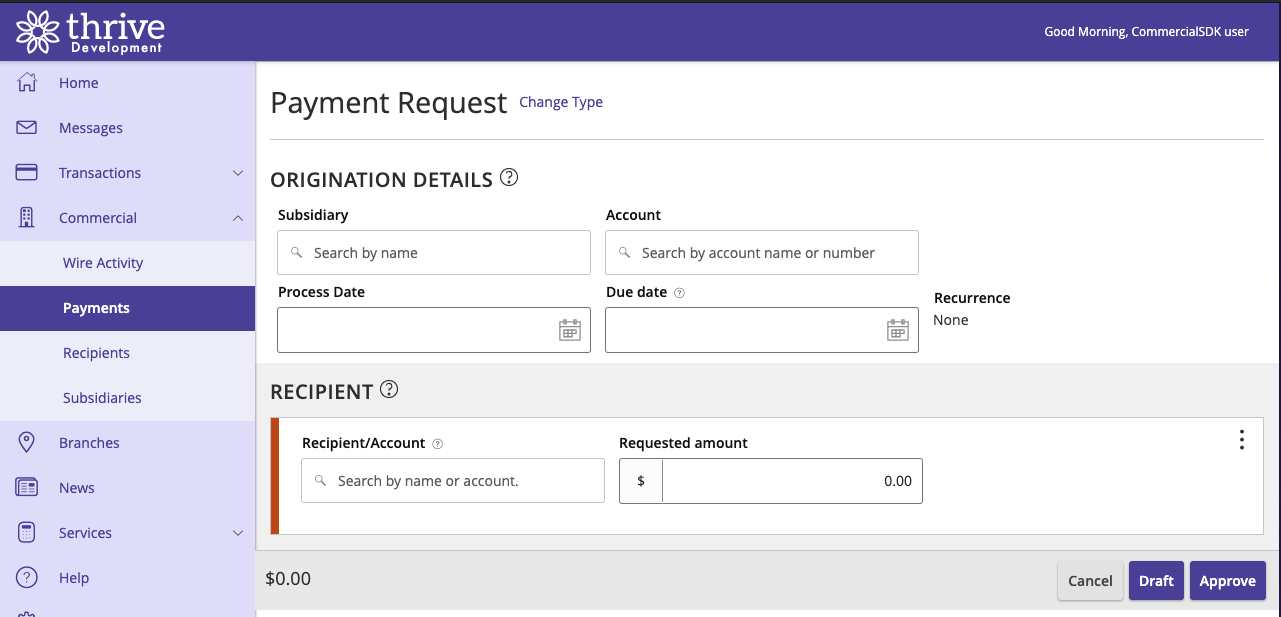
Log into UUX (with the user
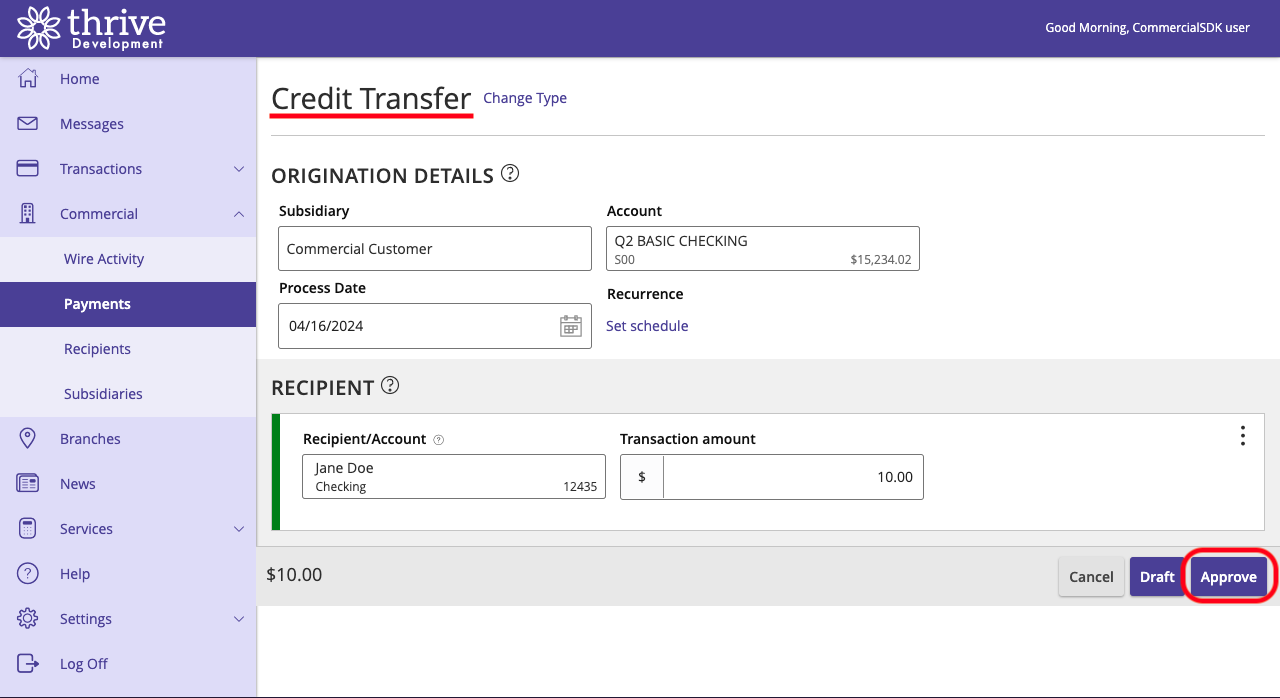
commercial0if you followed the above steps). Navigate to the UUX Payment Request page and fill in some details: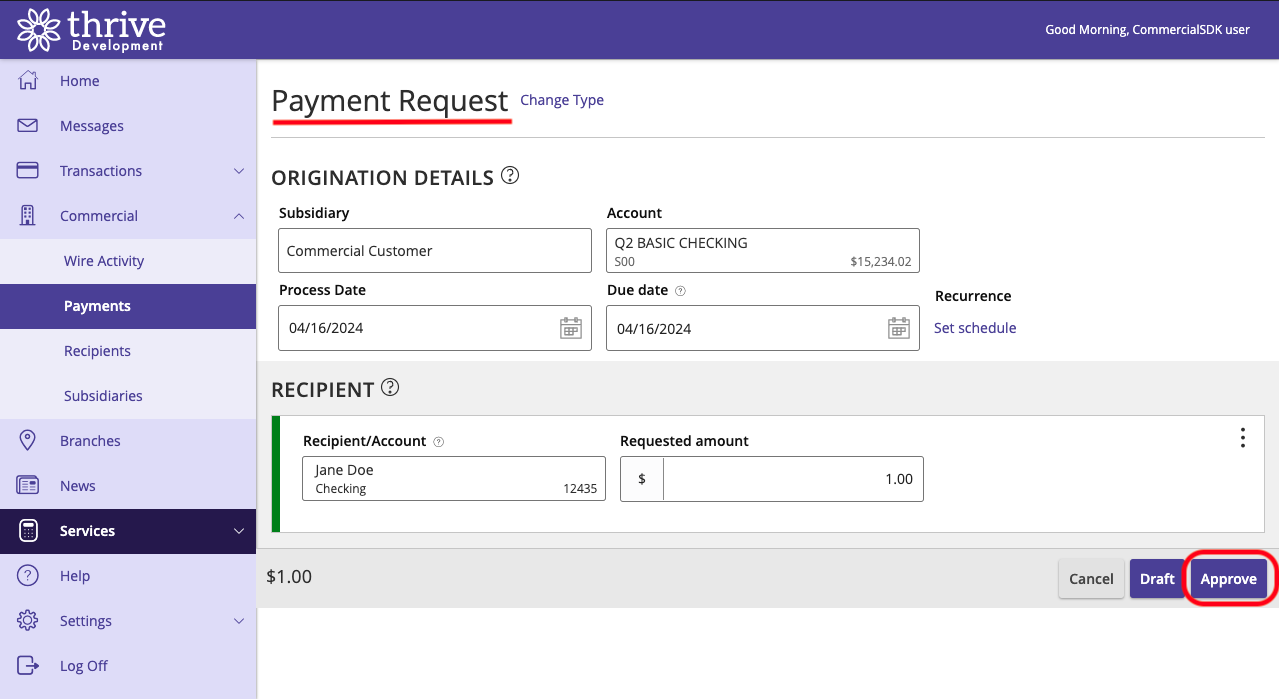
After you click Approve (or Draft), you should see logs in your locally running server. Here’s an example:
2024-04-15T19:38:18.886 extension.PayMeNow/requestforpayment INFO     Q2     aa421bc216414b29a3055f45b2187741 RequestForPayment route
2024-04-15T19:38:18.886 extension.PayMeNow/requestforpayment INFO     Q2     aa421bc216414b29a3055f45b2187741 RealtimePaymentRequest(generated_transaction_id='10002', user_id=3, customer_id=3
, debtor=Q2Entity(name='Jane Doe', organization={}, account_number='12435', agent='022222222'), amount=1.0, currency='USD', condition={}, creditor=OtherParty(name='Commercial Customer', addre
ss={'address_1': '13785 Research Blvd', 'address_2': 'Suite 150', 'city': 'Austin', 'state': '94730', 'zipcode': 'TX', 'address_type': 'Home', 'country': 'USA', 'province': '', 'additional_de
tails': {}}, email='noreply@q2ebanking.com', account_number='S00'), expiry=None)
2024-04-15T19:38:18.887 tornado.access  INFO     200 aa421bc216414b29a3055f45b2187741 POST /PayMeNow/requestforpayment (::1) 25.72ms
You will also see a confirmation of the transfer in the Activity Center page:
Try the same thing for CreditTransfer:
Summary
And that’s it! Try playing around with the response. For instance, if you set the Response’s success boolean to False, how does that affect the result on the Activity Center page?
Remember, all we’ve done with this extension is let the UUX frontend and database know we moved the money successfully. What is still up to you is actually doing the work! Using the
same tools as we’ve seen in other tutorials such as q2_requests, caching, and logging, the next step is to integrate with your payment provider. Have fun!