Post Example
In the previous section, we learned how to leverage the self.request_parameters attribute to retrieve query and body
parameters from the request. However, this is one of many functionalities at your disposal. In this section,
we will update an end-user’s account nickname which will allow us to explore the full capabilities of the SDK custom endpoint
extension.
Initial Setup
First, we will want to grab the necessary imports:
from q2_sdk.hq.hq_api.q2_api import ChangeEndUserAccountNickname
from q2_sdk.hq.models.db_config.db_config import DbConfig
from q2_sdk.hq.models.db_config.db_config_list import DbConfigList
Be sure to add these at the top of the extension.py file.
Since our objective is to update account nicknames, let’s first register a nickname prefix to the database. This will help categorize the user’s accounts:
WEDGE_ADDRESS_CONFIGS = DbConfigList(
    [
        DbConfig("NickNamePrefix", "API Set: "),
    ]
)
Once the extension is installed, the NickNamePrefix will be registered as a wedge configuration and
will automatically be accessible through the self.wedge_address_configs attribute.
In order to update account nicknames, we will also need to retrieve certain bits of information from our request. Let’s define them as required parameters:
REQUIRED_PARAMETERS = ["LoginName", "HostAccountID", "RequestedNickName"]
Retrieving Required Values
Before proceeding, let’s ensure we have access to these values so that they are readily available when we make our
request from the API. Feel free to use your login from the Online Banking Form tutorial. Otherwise,
you can create a new one via the q2 create_online_user command.
Next, we will need the host account id of the user’s account. Please move on to the next section if you have one handy.
Otherwise, a new account can be created via the q2 add_new_account CLI command. Once run,
you will be prompted to fill out various account details and will be provided with a host account id:
$ q2 add_new_account
    ...
    New Account created with ID: 1234
Continue to follow the prompts until you are asked to link the account to a login. Make sure to select Y and
provide your login name. In this example tutorial, we will be using retail0:
$ q2 add_new_account
    ...
    Account populated with HADEs
    Do you want to link this account now? [Y/n] Y
    What login do you want to link this account to?: retail0
At this step, you should have a login name and host account id. The RequestedNickName parameter will be provided at request time. Now that we have all of the pieces we need to update account nicknames, we are ready to move on to the next section.
Overriding the Post Function
In this section, we will break down the logic for the post() method. This method will take in our required parameters from the request payload, perform some validation on these, and attempt to update the account nickname using the host account ID. Let’s explore the code:
    async def post(self):
        self.set_header("Content-Type", "application/json")

        if not self.request_parameters:
            errors = [{"code": 400, "message": "No request body"}]
            to_return = self.return_data({}, success=False, errors=errors)
            self.write(to_return)
            return

        missing_parameters = [x for x in self.REQUIRED_PARAMETERS
                              if x not in self.request_parameters.keys()]
        if missing_parameters:
            errors = [{ "code": 400, "message": f"missing required parameters: {missing_parameters}"}]
            to_return = self.return_data({}, success=False, errors=errors)
            self.write(to_return)
            return
        ...
Once again, we set our headers to applications/json. We attempt to retrieve all of the required parameters from the incoming request.
If no parameters are provided, or a parameter is missing, we utilize the self.return_data function to return an error message and error code
containing more details regarding the failure.
Notice, if you were to navigate through the various endpoints within the API documentation, the parameters in return_data
mirror the fields from the response payload of each endpoint:
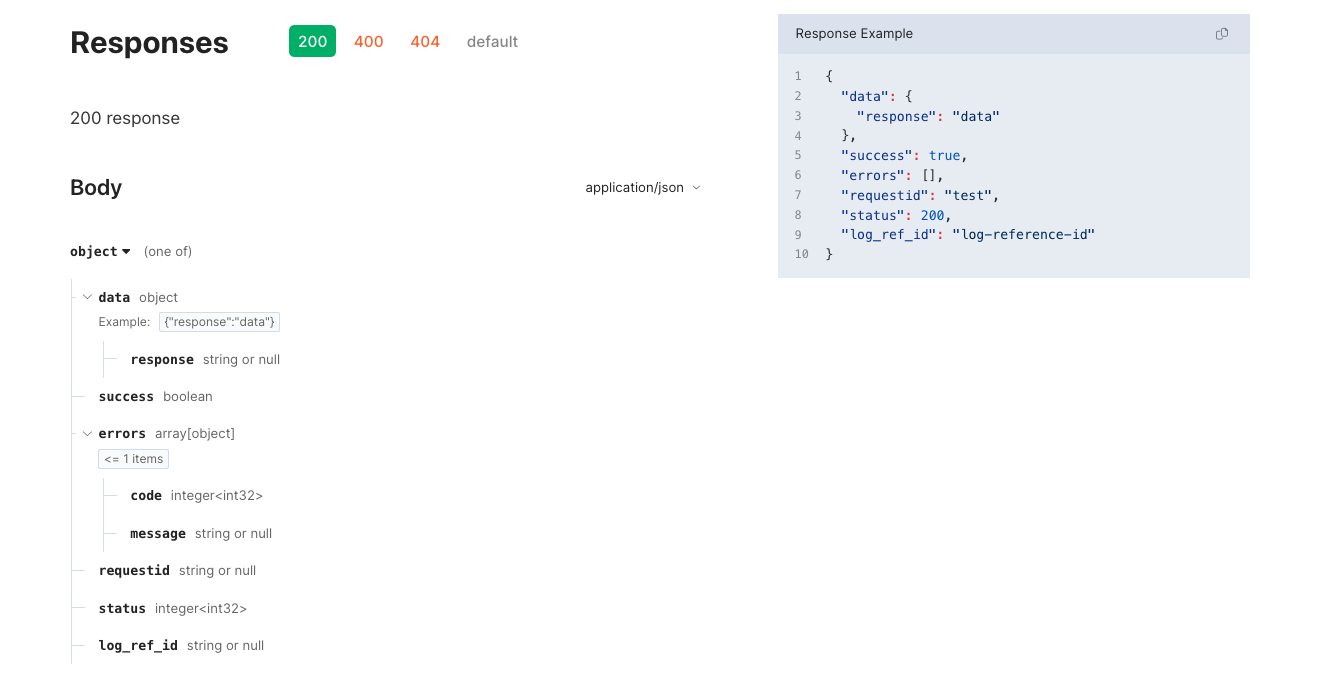
A data, success, and errors field will always be added as part of the response. We typically include an error code and message within
the errors section to detail the failures. As a best practice, we recommend that you provide a generic error message and log out additional details via
the self.logger property to avoid leaking any sensitive information. The remaining fields in the response, including the requestid, status, and
log_ref_id are automatically populated by the API.
Now that you have a better understanding of self.return_data, let’s move on to the next portion of the code.
We have ensured all of the expected parameters were provided in the request, the next step is to attempt to update the account nickname:
        ...
        constructed_nickname = f'{self.wedge_address_configs["NickNamePrefix"]}{self.request_parameters["RequestedNickName"]}'
        nickname_parameters = ChangeEndUserAccountNickname.ParamsObj(
            self.logger,
            self.request_parameters["LoginName"],
            "OnlineBanking",
            self.request_parameters["HostAccountID"],
            self.request_parameters["RequestedNickName"],
            hq_credentials=self.hq_credentials,
        )
        hq_response = await ChangeEndUserAccountNickname.execute(nickname_parameters)
        if not hq_response.success:
            self.logger.debug(f"Failed to update account nickname: {hq_response.error_message}")
            errors = [{"code": 500, "message": f"Internal platform error: failed to update account nickname"}]
            to_return = self.return_data({}, success=False, errors=errors)
            self.write(to_return)
            return

        data = {}
        response = self.return_data(data)
        self.write(response)
We first construct our account nickname: a string combination of our NickNamePrefix which we previously set as a database config, and the
RequestedNickName which was provided as part of the request body. Remember, self.wedge_address_configs will naturally be populated with
our database configurations and self.request_parameters with the request’s query and body parameters.
Now that we have a constructed nickname, we have all of the pieces required to create a params_obj and make a request to the ChangeEndUserAccountNickname HQ endpoint. For more details on this endpoint, please visit ChangeEndUserAccountNickname.
If the request is successful, we return an empty dictionary, set the success parameter in self.return_data
to True (this typically defaults to True if not provided as a parameter), and send the response. Otherwise, we log out a detailed error message,
and return generic information regarding the failure.
Please override the post function with the following:
    async def post(self):

        self.set_header("Content-Type", "application/json")

        if not self.request_parameters:
            errors = [{"code": 400, "message": "No request body"}]
            to_return = self.return_data({}, success=False, errors=errors)
            self.write(to_return)
            return

        missing_parameters = [x for x in self.REQUIRED_PARAMETERS
                              if x not in self.request_parameters.keys()]
        if missing_parameters:
            errors = [{ "code": 400, "message": f"missing required parameters: {missing_parameters}"}]
            to_return = self.return_data({}, success=False, errors=errors)
            self.write(to_return)
            return

        constructed_nickname = f'{self.wedge_address_configs["NickNamePrefix"]}{self.request_parameters["RequestedNickName"]}'
        nickname_parameters = ChangeEndUserAccountNickname.ParamsObj(
            self.logger,
            self.request_parameters["LoginName"],
            "OnlineBanking",
            self.request_parameters["HostAccountID"],
            self.request_parameters["RequestedNickName"],
            hq_credentials=self.hq_credentials,
        )
        hq_response = await ChangeEndUserAccountNickname.execute(nickname_parameters)
        if not hq_response.success:
            self.logger.debug(f"Failed to update account nickname: {hq_response.error_message}")
            errors = [{"code": 500, "message": f"Internal platform error: failed to update account nickname"}]
            to_return = self.return_data({}, success=False, errors=errors)
            self.write(to_return)
            return

        data = {}
        response = self.return_data()
        self.write(response)
Congratulations, you are ready to install your extension!